Originally posted on my disabled blog VintageCameras.info
The Pentax K1000 is definitely one of the most popular and iconic cameras of all time, yet it is remarkably simple and sturdy. It was introduced in 1976 when the Pentax K-mount was debuted and produced until 1997. There are a lot of them everywhere and people are still using those cameras up to this day! Also, it is just the perfect choice from those that are beginning in this art. That was a good reason to write this instruction manual and tutorial for the Pentax K1000.
That said, let’s see what the Pentax K1000 has to offer in this instruction manual.
Basic Controls
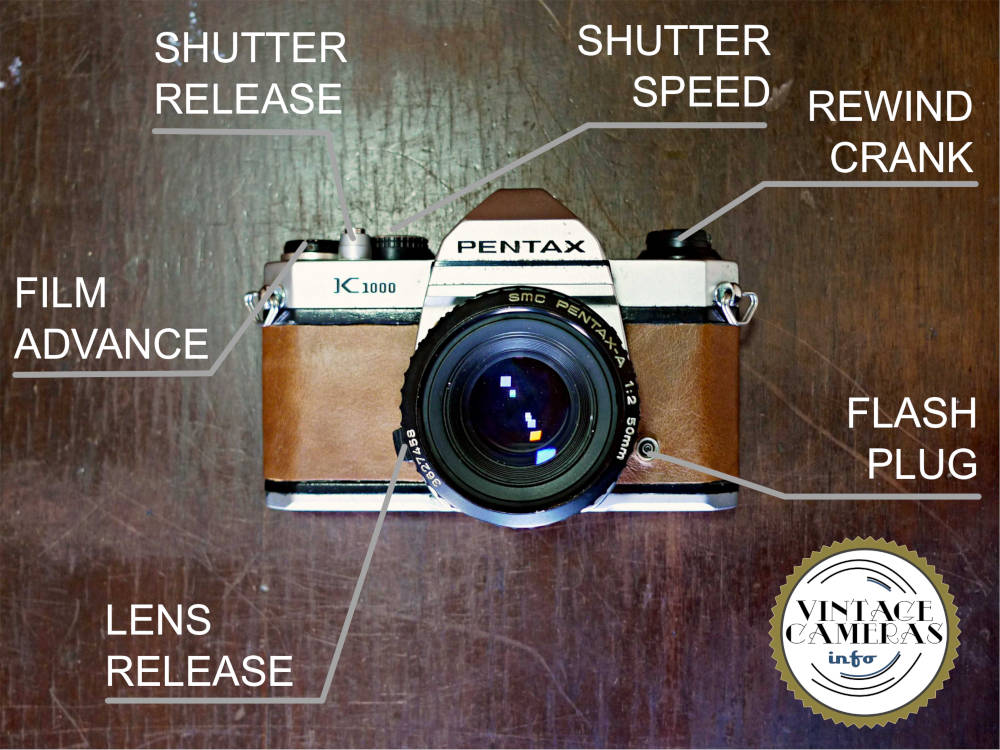
The aperture, focusing and zoom (when available) controls are in the lens, as is the standard in the SLR design. It has only one button at the front of the body which function is to release the lens. Also, there is a flash plug at the front of the body.
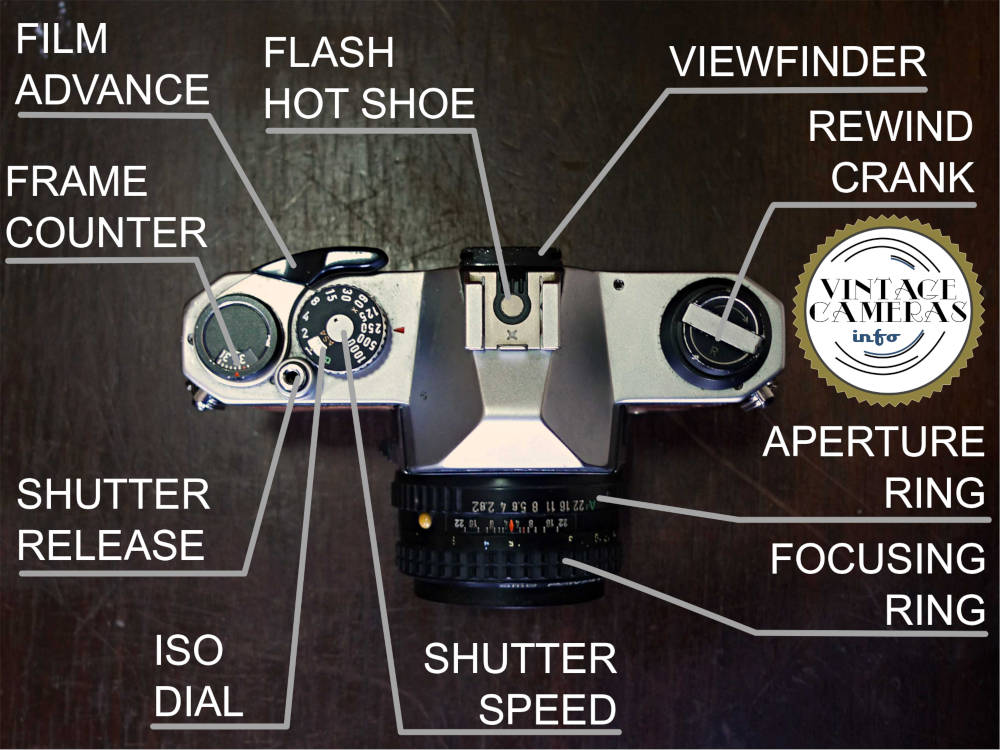
At the top of the body of the camera itself, there are the other controls. The shutter speed and ISO are controlled in the same dial. The frame counter and the film advance lever are placed together. In the center is the flash hot shoe. On the other side is the film rewind crank.
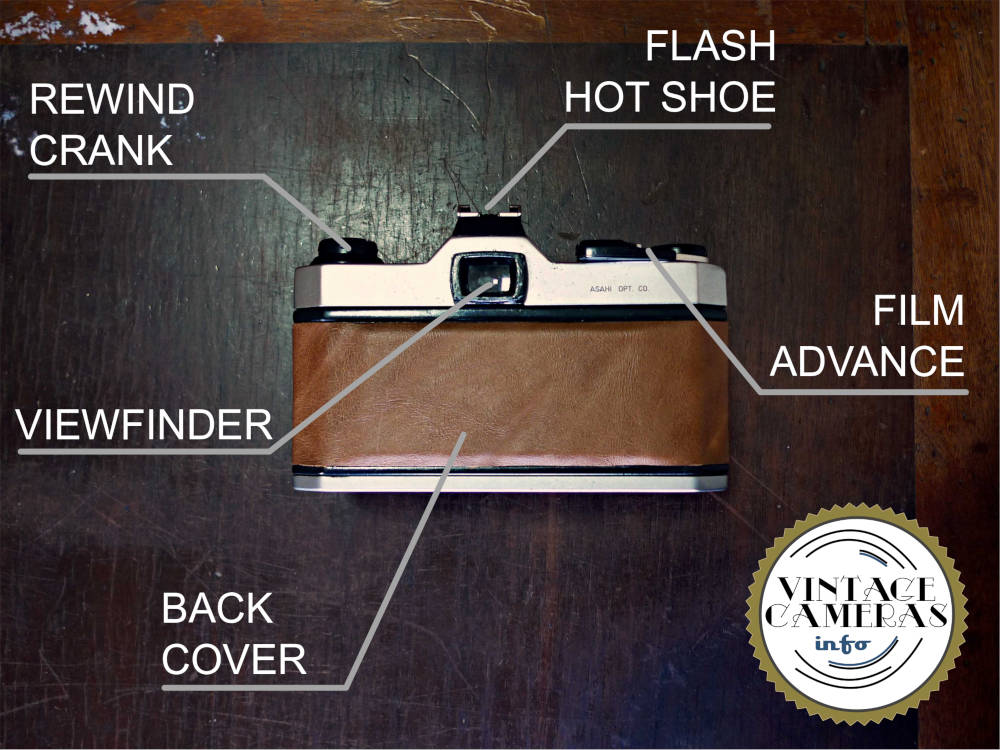
From the back, the most important feature, of course, is the viewfinder. You may be wondering about the leather finish of my camera. I did it myself with very basics tools. It feels much better than the original leatherette, a lot nicer to hold and is so stylish!
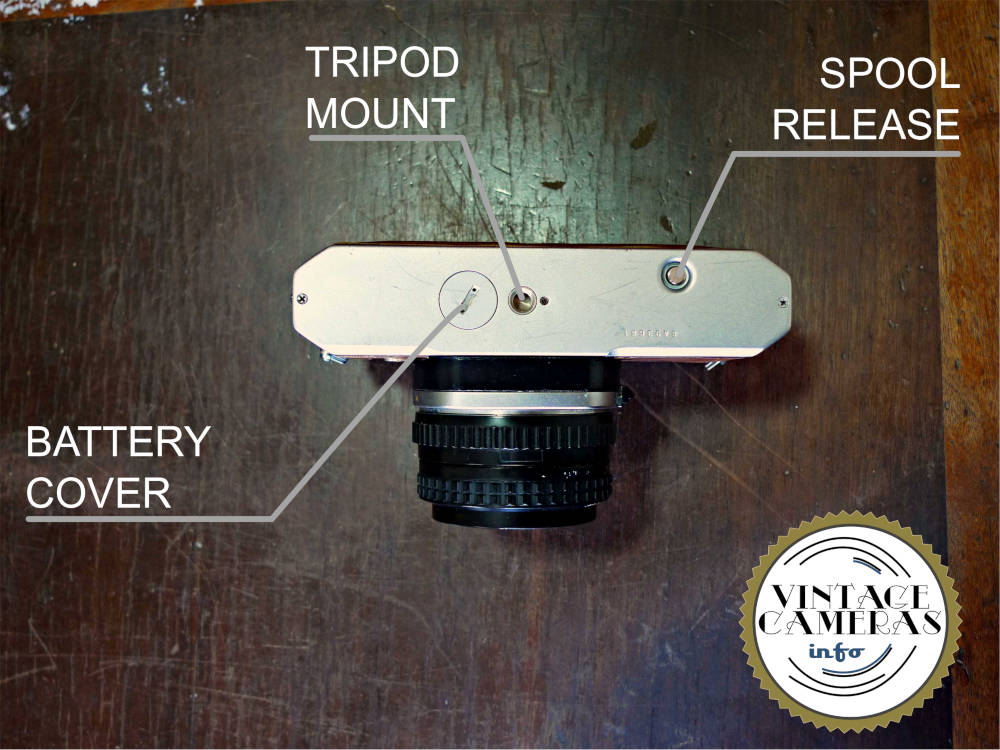
On the bottom, there are the battery cover, the tripod mount, and the spool release button. Now is a good time to put your hands in the camera, have a good look at it and try to memorize everything because we are going to talk about those parts all over this manual.
Putting batteries in the Pentax K1000
Let’s start this Pentax K1000 instruction manual by the first thing you need to do in order to operate your camera, the battery. To install the battery in the Pentax K1000, just follow these steps:
- Use a penny to unscrew the battery cover. It takes several turns to do so.
- Insert one LR44 battery with the positive pole facing up. There is a plus sign at the cover indicating it.
- Screw the battery cover in place.
- Done!
If your camera is working fine, the needle inside the viewfinder must be going up and down while you aim the camera at lights. We are going to see how it works in the next session.
Photometry
The photometry in K1000 is a straight-forward process. It has a needle on the right side of the viewfinder that moves up and down along a scale on the right. Open the aperture and the needle moves up, close and it moves down. The same goes as you change the shutter speed. The ideal exposition parameters occur when the needle is right at the center.
It is also worth noting that the metering is done at the center of the screen, so be aware when metering around scenes with a great variation of light intensity. However, you can always aim it on highlights or dark spots to compensate for the exposure accordingly.
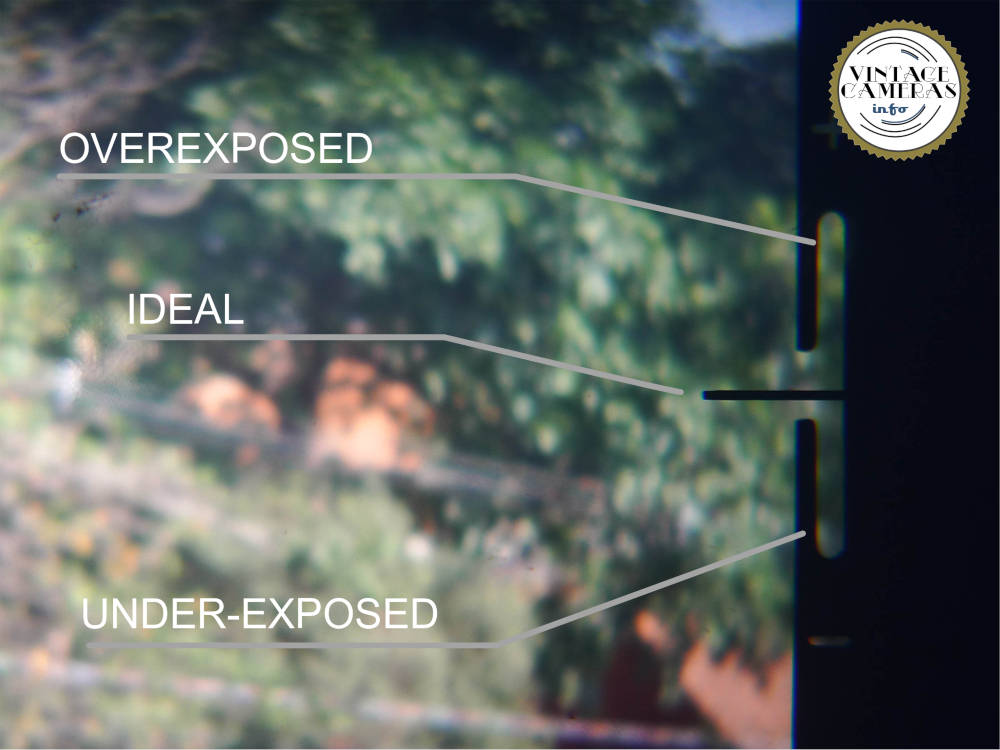
To find the best exposure with the Pentax K1000 I suggest the following procedure:
- Find the main subject of the scene, the one you want to be perfectly exposed. Aim the camera at it.
- Now I set the aperture I want so I have the desired background blur or sharpness.
- Then I change the shutter speed until the needle is inside the sweet spot.
- If I can’t find a good configuration, I then change the aperture one step and try again.
- The needle doesn’t need to be perfectly level, though. Anywhere it lies inside the central recession is usually fine.
- This is, basically, how you do the Aperture Priority mode by hand.
Shutter speed and Bulb mode
The Pentax K1000 has a wide range of available shutter speeds from 1s to 1/1000s. The shutter speed is selected using the dial at the top of the body. Although it was a breakthrough at the time, the 1/1000 can be considered slow by later standards, such as the Pentax Z1 that was capable of 1/8000! Nonetheless, 1/1000 is more than enough for the great majority of situations.
The Pentax K1000 is also capable of fairly slow speeds that are useful when making stills using a tripod and some feeble illumination. However, I don’t consider it suitable for night photography.
In that case, the solution is to use the Bulb mode with a remote shutter release cable. In this mode, the shutter is kept open while the shutter-release button is pressed and it is closed when it is released. This way, any exposure time can be achieved with this camera!
If you intend to make night photography with the Pentax K1000, consider getting a good tripod and a remote shutter release cable that can be screwed in the shutter release button.
Focusing in the Pentax K1000
The focusing system of the Pentax K1000 is a pretty much standard SLR-style one. It varies from model to model, some have a split beam design and others doesn’t. Mine has only a small circle at the center.
However, the basics of focusing apply here. Rotate the focusing ring of the lens back and forth until the subject forms a nice and uniform image at the screen. My experience with the focusing in the K1000 has been remarkably good and I consider it one of the best performers of my collection in this department.
One feature that the Pentax K1000 lacks is the depth of field preview, so it is not possible to foresee how blur will the background be when the aperture is closed. On cameras that are able to do it, like the Zenit 122, I rarely use this feature, though.
How to load film in the Pentax K1000
Now that we know how to prepare the camera, adjust the parameters and focus, we can slap some film in and hit the street! To load film in the Pentax K1000, follow these steps:
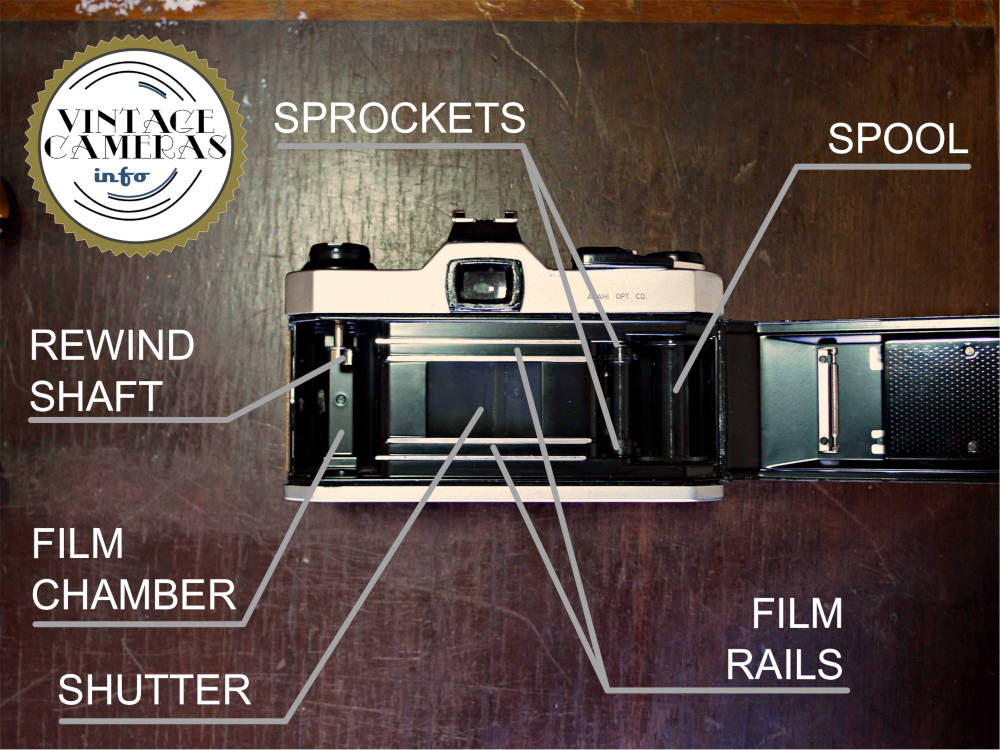
- Open the back cover by pulling the rewind crank knob.
- Insert the film into the chamber and push the rewind knob, so the rewind shaft will engage the film roll.
- Pass the film over the rails and land its tip inside the spool hole. Make sure it passes through and is firmly engaged.
- Rotate the spool from right to left using the wheel it has at the bottom to stretch the film.
- Now, while the film is stretched it must engage the sprockets. If it didn’t, help it with your fingers.
- Close the back cover.
- Press the shutter release button and advance the film using the lever.
- Repeat until the frame counter indicates ‘0’ and make sure the rewind crank rotates while the film is advanced. If it doesn’t, open the back cover and start all over again.
- Set the ISO as described in the next session.
- Done! It is time to have some fun!
How to set the ISO in the Pentax K1000
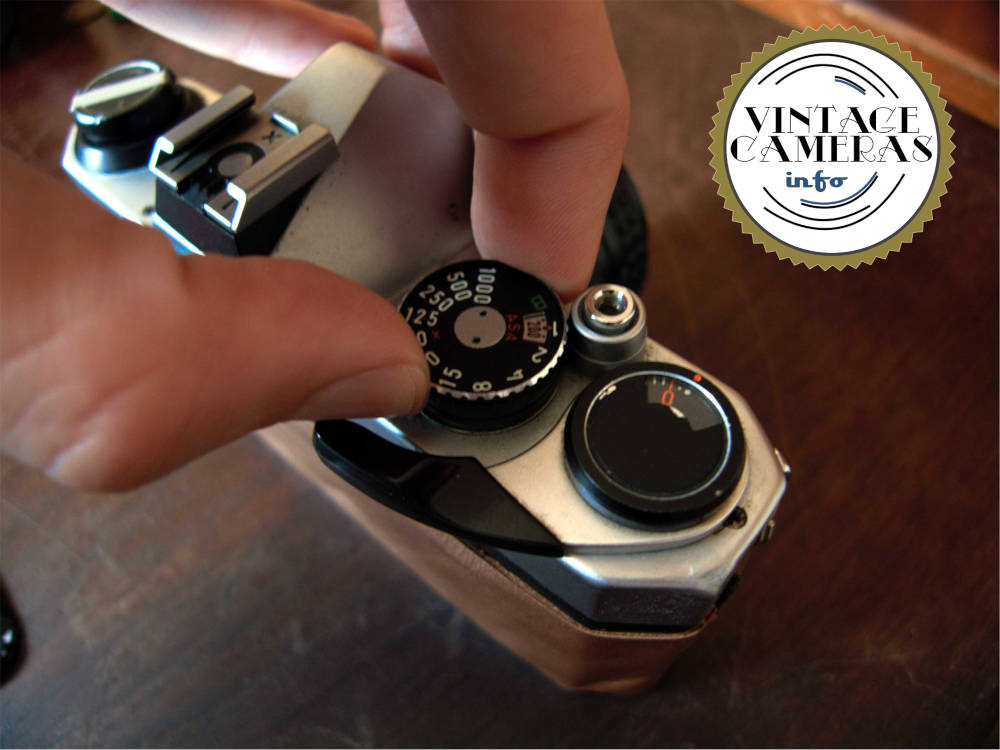
The ISO can be set by rotating the shutter speed dial while pulling it up, as in the photo below. It ranges from 20 up to 3200, thus covering almost all the film options available in the market. Also, it is indexed in half steps between the ISOs, so you can fine-tune the exposure.
ISO calibration
A recurring problem that film cameras use to have overtime is the ISO miscalibration due to the aging of optics and electronics. The remedy for this involves opening the cameras and, sometimes, replacing components. Since those cameras don’t have much value, it is not always worth fixing them.
However, in this case, whenever I use my Pentax K1000, I calibrate it using the sunny 16 rule. I point the camera to a bright object illuminated by the sun, set the shutter speed according to the film’s ISO and the aperture to f/16. Then I pull and rotate the ISO dial until the photometer needle reaches the center.
How to rewind and unload film in the Pentax K1000
To unload the film of your Pentax K1000, follow these steps:
- Press the spool release button at the bottom of your camera.
- Rotate the rewind lever clock-wise until you feel the film is loose from the spool.
- If you are not sure the film is fully rewinded, keep cranking. At some point the crank will be loose.
- Open the back cover, pull the rewind crank and remove the film.
How to use the flash in the Pentax K1000
To use the flash in the Pentax K1000 just put it into the hot shoe or use the flash plug at the front of the camera. Then set the shutter speed to 1/60s, which is the synchronous shutter speed for this camera and is marked with an orange ‘X’ in the dial. Now set the aperture according to the table of your flash and it is done.
How to remove and install the lens in the Pentax K1000
To install the lens in the Pentax K1000 just follow these steps:
- There is a red dot at the lens and a corresponding one at the camera body, align then.
- With the dots aligned, insert the lens into the bayonet.
- Turn the lens clockwise until it engages the latch. You will hear a click when it engages.
To remove the lens in the Pentax K1000, follow these steps:
- Press the lens release button.
- While the lens release is pressed, turn the lens counter-clockwise about 1/3 of a turn until it unlocks.
- Pull the lens.
Always be careful to not touch the glass surfaces of the lens.
How to deal with a stuck K1000
This is a common problem and, for this reason, I decided to include it in the Pentax K1000 instruction manual. Those cameras are almost unstoppable, but no one beats time.
Film residues and other debris can clog the mechanisms of the camera preventing it from working correctly. It is very common to have a stuck shutter when operating at slow speeds below 1,30s. In this case, try the following.
Remove the bottom cover, it is held by three small philips screws. Inspect if there are any obvious things that should not be there, like chunks of old film. Usually, film debris is a very fine, sticky and dark gray substance. Remove all you can with a needle but avoid touching any component of the camera. Also, don’t disassemble anything further than the cover.
After all film debris is removed, use a cotton swab and Zippo fluid to clean the parts. Don’t use too much, just wet the swab and lightly touch parts. Don’t let any cotton fibers left inside the camera. Try to operate the camera while it is wet. Repeat this process over and over until it unlocks. If it still stuck after that, seek a professional.
If it unlocks, however, it is going to lock again after the zippo fluid dries. So the next step is to lubricate with very tiny droplets of watch oil or car brake fluid. Put a very light coat of oil in the articulations and that is it.