Originally posted on my disabled site VintageCameras.info
The Zenit 12XP is an SLR camera made in Russia in the 90s. As all Zenits, like the 122, they are simple machines with a reduced set of features but are remarkably mechanically sturdy. However, those cameras are a bit more complicated to operate than the most popular SLR cameras of this era, such as Nikon and Canon.
The camera of this article is the second Zenit I had bought, the first one is a Zenit 122. As usual, they came with the famous Helios 44m lenses. Both of them were dirt cheap, which makes those cameras a very nice deal, especially because of the lens, that can be used with DSLR through adaptors. Also, they are good cameras for beginners and it is not that difficult to find them below 20 bucks.
Although there may be some other choices in the entry-level market, such as the Pentax K1000, the Zenit 12XP is almost unbeatable because of the lens, which is a legendary piece of engineering whose origins are in Zeiss designs of the Eastern Germany Republic.
Parts of Zenit 12XP
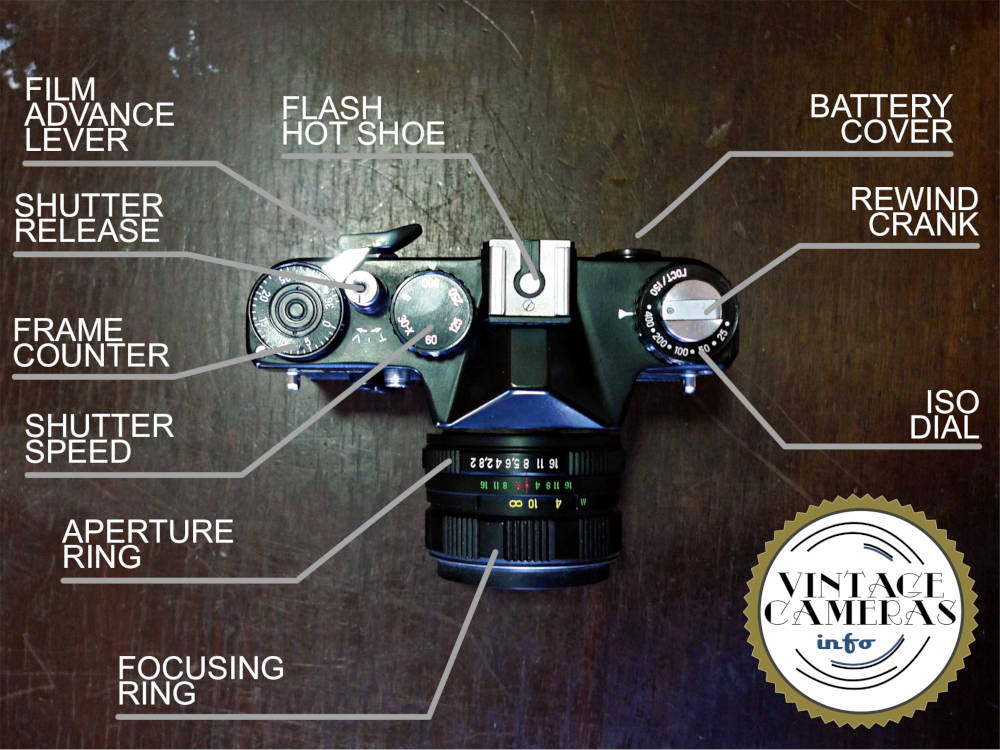
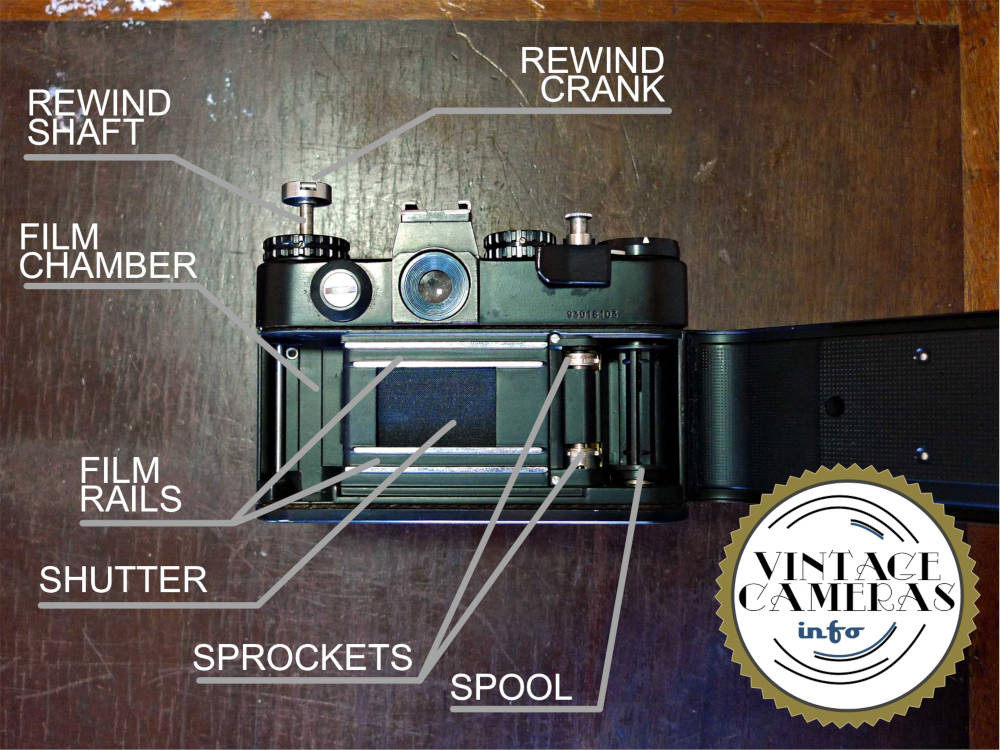
In the photos below, all the main parts of the Zenit 12XP are shown from all sides and inside. It has all the typical controls any all-manual mechanical SLR would have.
Since they are fully manual machines, you will find a shutter speed dial, an aperture ring, and a focusing ring. Almost all controls are in the body, except focusing and aperture that are both in the lens barrel.

From the top, we can see all the most important Zenit 12XP’s features. We are going through all of them in this manual, so grab your camera, have a good look and get used to it!
At the back, the most important feature is the viewfinder, which is the window through which we compose and preview our photos.

At the bottom is the tripod mount, which is an standard 1/4″ thread.

How to install batteries in the Zenit 12XP
I like to start my manuals by the forst procedure to turn the camera on, which is the battery installation. To install the batteries in the Zenit 12XP, follow these steps:
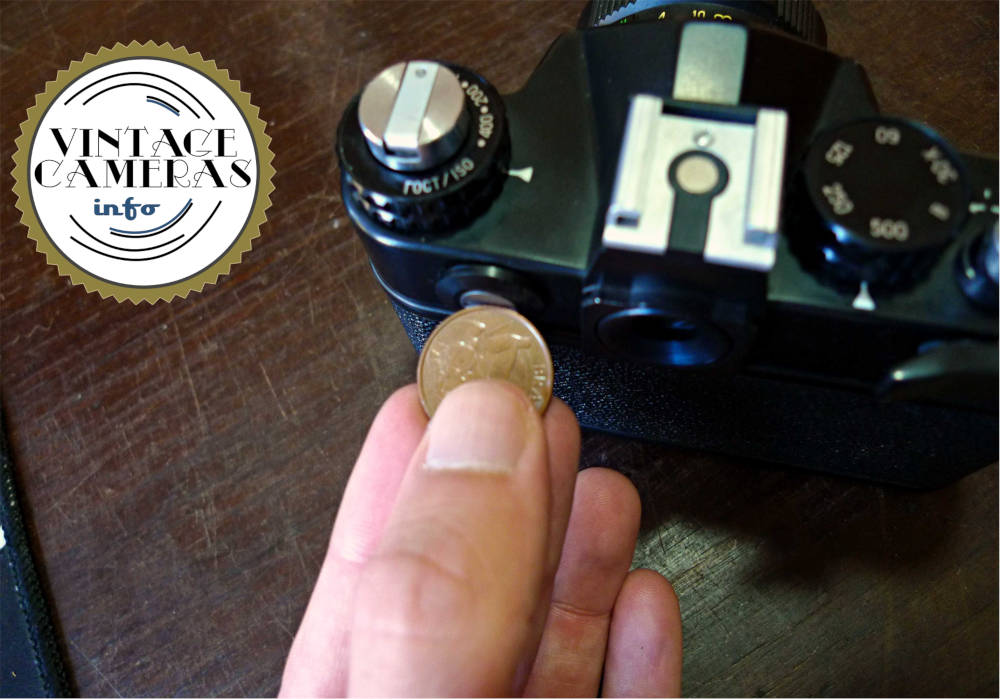
- Use a penny to flip the battery cover at the back of the camera, as shown in the image below.
- Turn it 90° counter-clockwise to make it free.
- Now you can remove the old batteries.
- Install the new batteries with the positive poles pointing out of the camera, as in the photo below.
- The Zenit 12XP operates with a voltage of 3V, which is obtained using two LR44 regular batteries. However, it can be difficult to fit them inside the battery chamber, so you can use one LR44 and one LR1130. Also, you can insert some tin foil between them until the cover has adequate pressure.
- Insert the battery cover in the same orientation as it was before and turn it 90° clockwise to close.
- Done! Your Zenit 12XP must be working!

The photometry
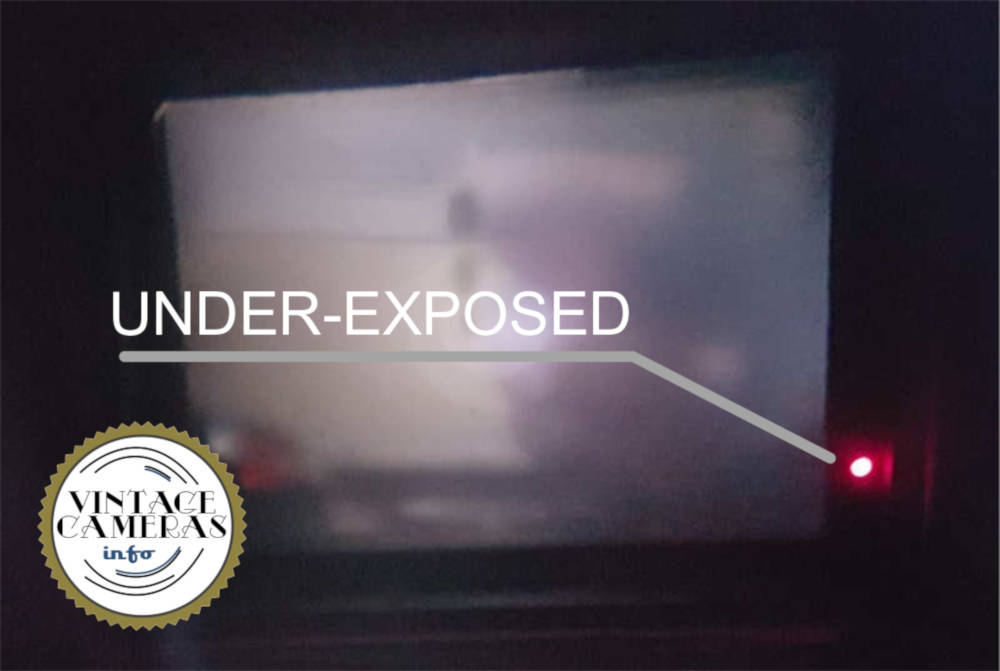
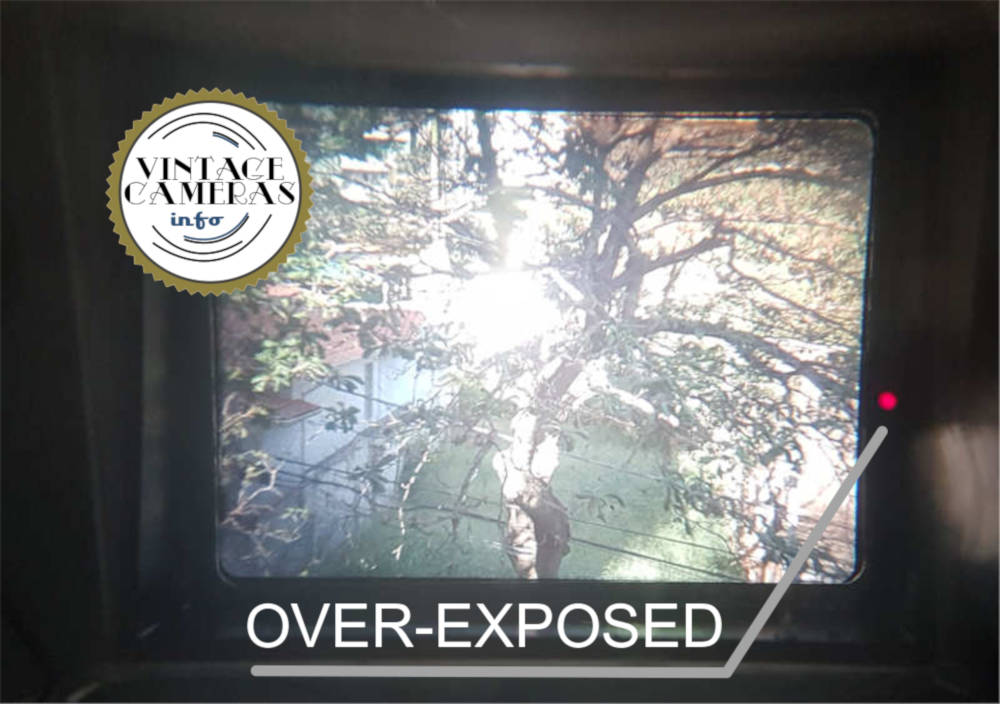
Now we can proceed to the photometry. The Zenit 12XP has two red LEDs inside the viewfinder on the right side. Those LEDs indicate if the scene is over or underexposed in the current configuration of the camera.
So, if the bottom LED is on, it means it is under-exposed. In other words, if you proceed and press the shutter-release button, the photo will be dark. On the other hand, if the scene is over-exposed, the top LED will light to indicate that the photo will be too bright using the current configuration.
The photometer is activated when the shutter release button is pressed halfway. You are going to feel the lens aperture mechanism being activated at this point. If the aperture is not wide open, the image in the viewfinder will be darker than before.
This happens because the Zenit 12XP reads the amount of light going through the lens to give you its estimated photometry. Also, this acts as a depth-of-field preview, as I will cover later.
So, to set the exposure correctly, aim the center of the viewfinder at the object you want as a reference, press the shutter release button halfway and change aperture and shutter until both LEDs start to blink alternatingly. I will go back to this topic later, so don’t worry.
Focusing with the Zenit 12XP
Focusing with the Zenit 12XP is done in the same way as almost all other SLRs. The center of the viewfinder has two concentric circles. If the image is out of focus, it will be extremely coarse inside those circles. The inner is the one that has the most intense effect, so it is used to make that fine-tune in focus.
The rest of the viewfinder screen also acts the same way but is finer. When a good focus is reached, the image will be nice and sharp all over the screen.
Remember when I talked about depth-of field preview? Now is the time when it comes into play. When the shutter release button is pressed halfway, the aperture is closed up to the value selected in the aperture ring at the lens barrel.
When the lens is closed, it will affect the background blur and how sharp things are in the image. This way, the photographer can have a good idea if the image will be sharp or blurred and adjust the aperture accordingly.
This is the time that most photographers use to set the aperture, since it affects compostion through sharpness. So, move the aperture ring until you find the image fits your taste. The next step is setting the shutter speed.
Shutter speed and Bulb mode
The Zenit 12XP has a limited range of shutter speeds. Although some people may think it could have more options, in my opinion, it is ideal for those that are beginning and they cover almost all the situations. The shutter speeds available in the Zenit 12XP are 1/30, 1/60, 1/125, 1/250 and 1/500.
Since the most common Helios lenses are 58 and 85mm, a shutter speed below 1/30s isn’t really necessary since shooting slower than this would require a flash, anyway. Higher speeds than 1/500 are mostly needed when doing extreme bokehs at noon, for example. In this case, you can shoot later or use neutral density filters, such as some sunglasses, to reduce light intensity. Anyway, most of the time I use mine without any problems.
After you had set the focus and aperture let’s go back to photometry. Now you have the best condition for your composition and it is time to adjust the speed to correctly expose the film. While holding the shutter-release button halfway, adjust the shutter speed through the dial at the top of the camera. Go back and forth until both LEDs start to blink. However, be aware of the B mode because you can’t see it is selected and it will ruin your photo for sure. I will explain it in the next section.
Now you can fully press the shutter-release and you will listen the magnificent mechanical clunk of the Zenit 12XP mechanism. Satisfyting stuff! Advance the film using the lever and you are ready to the next one.
The Bulb mode
Since this camera doesn’t have any speeds below 1/30s, Zenit included a nice feature that is the Bulb mode. In Bulb mode, which is selected through the ‘B’ at the shutter speed dial, the camera keeps the shutter open while the shutter release button is pressed. When it is released the shutter closes. This way, the shutter is kept open while the shutter release button is pressed.
Using Bulb mode you can achieve any exposure time you want, from seconds to minutes, hours, or days while the shutter released is pressed. It is useful for night or low light photography and it is a good idea to use a shutter release cable attached to the shutter release button, so you don’t disturb the camera. It is good practice to use a tripod when doing this type of photography.
The reason why selecting Bulb mode by mistake will ruin your photo is because the shutter will surely stay open much more than 1/30s, affecting the exposition and also introducing motion blur.
How to load film in the Zenit 12XP
First, have a look inside your Zenit 12XP and get familiarized with its parts.
Now you know all you need to start taking photos with your Zenit 12XP, it is time to throw some film in and hit the street. To load film in the Zenit 12XP, follow these steps:
- Open the back cover by pulling the rewind knob upwards. Keep pulling it until the back cover opens.
- Now that the rewind shaft is retracted inside the body, put the film roll in the chamber.
- Press the rewind crank back to its original position, so the shaft will engage the roll.
- Press the shutter release button until the end and turn it 90° counter-clockwise into the ‘T’ position.
- Pass the film over the rails and insert its tip into the spool hole.
- Pull the film advance lever just a little bit to stretch the film. Don’t pull too much to not waste too much film.
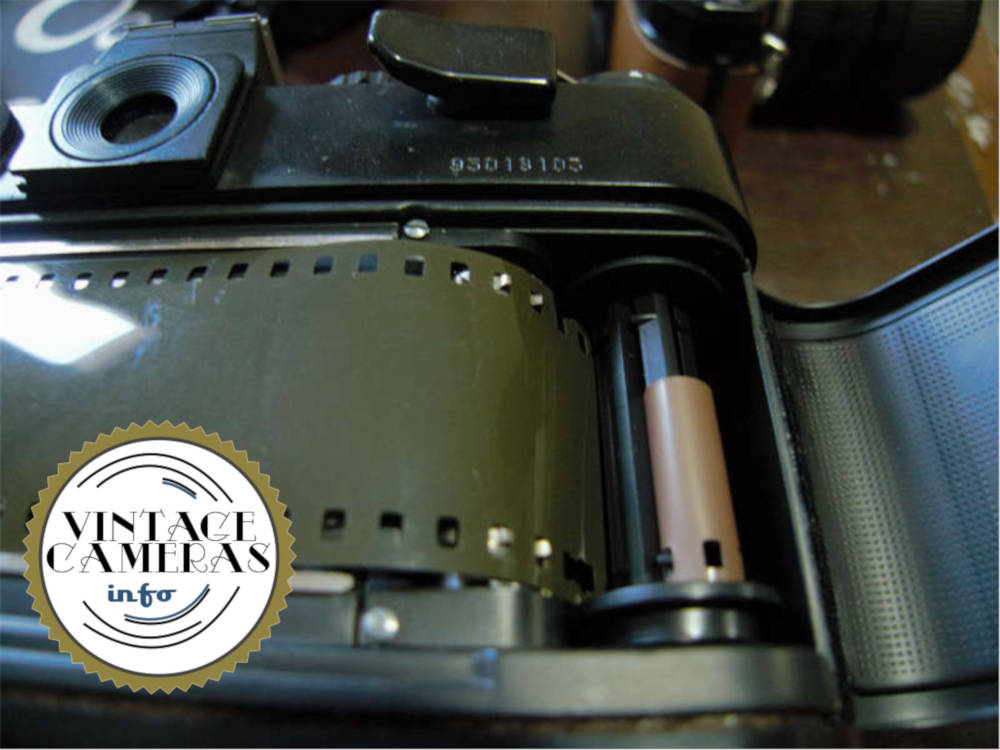
- See if the film engaged the sprockets while you were pulling the advance lever, as in the image below. If they aren’t engaged, help with your fingers.
- While closing the back cover, stretch the film a bit more with the advance lever.
- Turn the shutter release 90° clockwise to its normal position.
- Pull the film advance lever two times until it reaches the end.
- Select the ISO corresponding to your film using the ISO dial. The ISO can be fine-tuned as I will show later
How to rewind and unload film in the Zenit 12XP
Rewind the film in the Zenit 12XP is very simple but there is a catch. The spool release button is almost a hidden feature sitting below the shutter release button, as shown in the photo below. This is how you rewind and unload film in the Zenit 12XP:
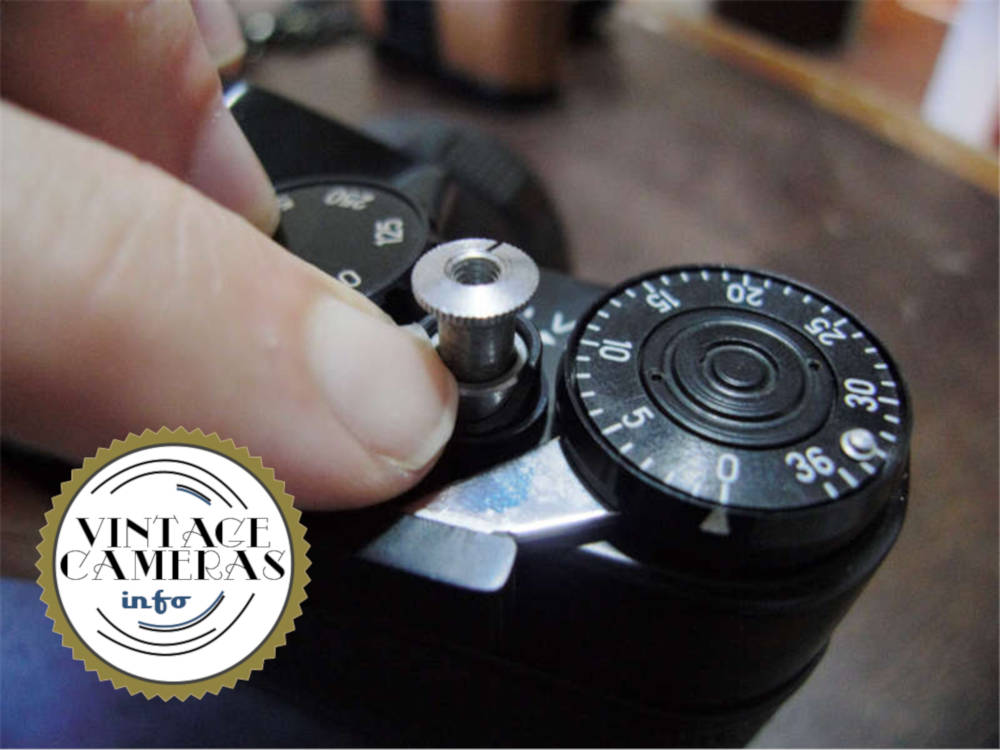
- Press the spool release button with your nail as shown in the photo above. It is a bit hard, so you must use some force. You are going to feel when the spool is free.
- Rotate the crank clockwise until the film is completely free from the spool. If you are note sure, keep turning.
- Open the back cover pulling the rewind crank knob up and pull the film roll.
How to use the timer in the Zenit 12XP
The Zenit 12XP has a built in timer so you can do selfies with it. To use the timer of the Zenit 12XP, follow these steps:
- Press the shutter release button halfway and turn it clockwise to the ‘V’ position. Be aware that an accidental shot here is very likely (ask me how I know it), so be careful. I always take this step before I advance the film lever, just to make sure.
- Pull the timer winder lever 180° downwards.
- Do all the adjustments such as composing, focusing, aperture, and speed setting.
- Press the timer release button that is located just above the winder lever.
- Run Forrest, run!
How to use the flash in the Zenit 12XP
To use the flash in the Zenit 12XP, just install it in the hot shoe, select the 30-X speed in the shutter speed dial and adjust the aperture according to your flash’s table. The flash can also be used with a chord attached to the flash plug at the front of the camera.
Zenit 12XP Tips
here are some things I had learned using my Zenit 12XP.
ISO fine-tuning and calibration
As cameras get old, their optics and electronics can deteriorate. As a matter of fact, most of them will experience some kind of ISO miscalibration. Since the best remedy for this is opening the cameras and, sometimes, replacing parts, it is not always economically viable since those are pretty cheap cameras.
However, it is possible to avoid this problem by using this simple procedure. I use the sunny 16 rule to calibrate the photometer of all of my cameras. To do that, in a sunny day, I point the camera to a bright spot say, a building hit directly by the sun. Then I set my aperture to f/16 and the shutter speed the closest to the ISO of the film. For example, if the film is a 400 ISO, the shutter speed should be 1/500. If it is 200 ISO, the shutter speed should be 1/250, and so on. Then I turn the ISO dial until both LEDs start blinking.
Attaching and removing the lens
The Zenit 12XP uses an M42 lens mount, which is just screwed in the body. To remove the lens, unscrew it. To install, screw in place. However, don’t screw it too tight because it will be a real pain if the lens gets stuck in there. On the other hand, if it is not tight enough the lens will loosen while focusing, especially because the focusing rings of the Helios lenses are usually quite tight.
Thank you! This was very useful to repair my camera. I didnt know where to start (how it should work).
Hello Fabio,
That”s great manual/guide related zenit 12xp. The tip to use two different size batteries was amazing and my old zenit (the gift from my god father) is functioning now. Thank you. By the way, do you know what is the mechanizm for time release button? My is constantly pressed down and the time lever starts immediately.
Hi Martin, thank you for your comment! If I remember correctly (I already sold mine some time ago), this may have to do with the position of the trigger. Check if it in the correct position.