Praktica was the official film camera brand from Eastern Germany’s legendary Zeiss company through the Pentacon factory. Just for this fact alone, you can see we are talking about legendary stuff here. The Praktica B200 was a breed of technologically advanced machines at the time, using electronics to control timing, photometry, and the bleeding edge technology of aperture priority.
Its design is quite typical from East Germany: boxy, heavy, and a distinctively solid feeling. Also, the line of Pentacon’s Prakticar lenses is just amazing. Mine came with a 50mm f/1.8 Prakticar MC, which is capable of incredible bokehs and also astounding sharpness, if when used wide open. This combination is perfect for bokehs and close-ups, especially when combined with the fast shutter speed of the B200 body on brighter days.
Talking about the B200 body, which is the main subject here, it is equipped with all the features one could expect from a top-notch camera from the late 70s. It has an aperture and fully manual modes, shutter speeds ranging from 8s to 1/1000s, a really nice split-beam focusing system, and a depth-of-field preview. The Praktica is very similar to the Yashica FX-D in terms of features and operation.
For sure, the Praktica B200 Electronic is one of the best value for features you can find. It is one of the best cameras in my collection and I love to shoot it. All that said, let’s start this Praktica B200 Electronic manual, so you can learn how to use yours and enjoy it!
The parts of the Praktica B200 Electronic
Since the Praktica B200 is a camera fully loaded with features, so is its body. However, it goes in line with the SLR designs of its age. From the front, we can see most of its commands, like the lens release, depth-of-field-preview, shutter-release and its safety lock, the shutter speed dial, the film rewind crank, and the ISO dial.
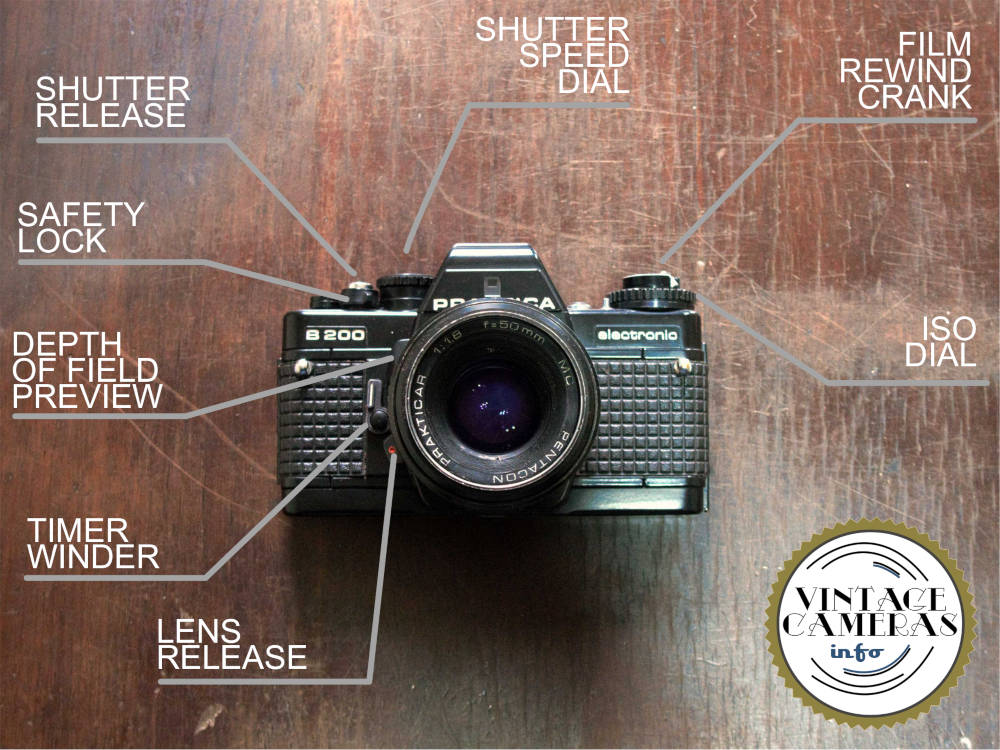
From the top, we can also see the frame counter, the flash hot shoe, and the exposure compensation release. The aperture and focusing rings, as usual, is located on the lens barrel along with the zoom ring, if available depending on the lens you are using. Mine is a 50mm f/1.8 prime (fixed focal length).

From behind, the most important feature, of course, is the viewfinder. That big square at the center of the back cover is a frame in which you can place the top of the film roll’s box, so you can remember what film is loaded.

From the bottom, we find the tripod mount, which is a 1/4″ standard screw, the battery cover, and the provisions for a motor drive accessory.

How to install the batteries in the Praktica B200 Electronic
Now that you know the main parts of your Praktica B200, it is time to install some batteries and get ready to go. To install the batteries in the Praktica B200, follow these steps:
- Open the battery cover. To do so, use a penny to turn the door cover screw counterclockwise 90°. This system is a bit tricky and sometimes it may not be so easy to open it. If you can’t open the battery cover, never force it. Turn the screw a bit more and try again. At some point, it will open.
- Once the battery cover is open, install four LR44 batteries as oriented in the photo below. The Praktica B200 operates with a 6V battery which I could find no clue of what type is and, even if I know the correct type, I doubt I could find one to buy. Since the LR44s are not suited for this application, some adaptation is needed. Place a small ball of aluminum tin foil between the plus pole of the first battery and the electrical contact of the body. This will do the trick.
- Close the battery cover turning the screw clockwise 90°. Test if its close because it can also be tricky.
- Look into the viewfinder and press the shutter release button. If it is stiff, turn the knob around it about 45° counterclockwise to unlock it and try again. You should see some LEDs on the right side of the viewfinder if your Praktica B200 is working.

Photometry
The photometry system of the Praktica B200 is very intuitive and easy to use, but depends on the shooting mode you are using.
Aperture Priority mode
To select the aperture priority mode, select the ‘automatic’ position in the shutter speed dial. In this mode, the user selects the aperture through the ring in the lens barrel and the camera will adjust the ideal shutter speed automatically. This is the most used shooting mode of all cameras until today, so it is a very nice feature to have.
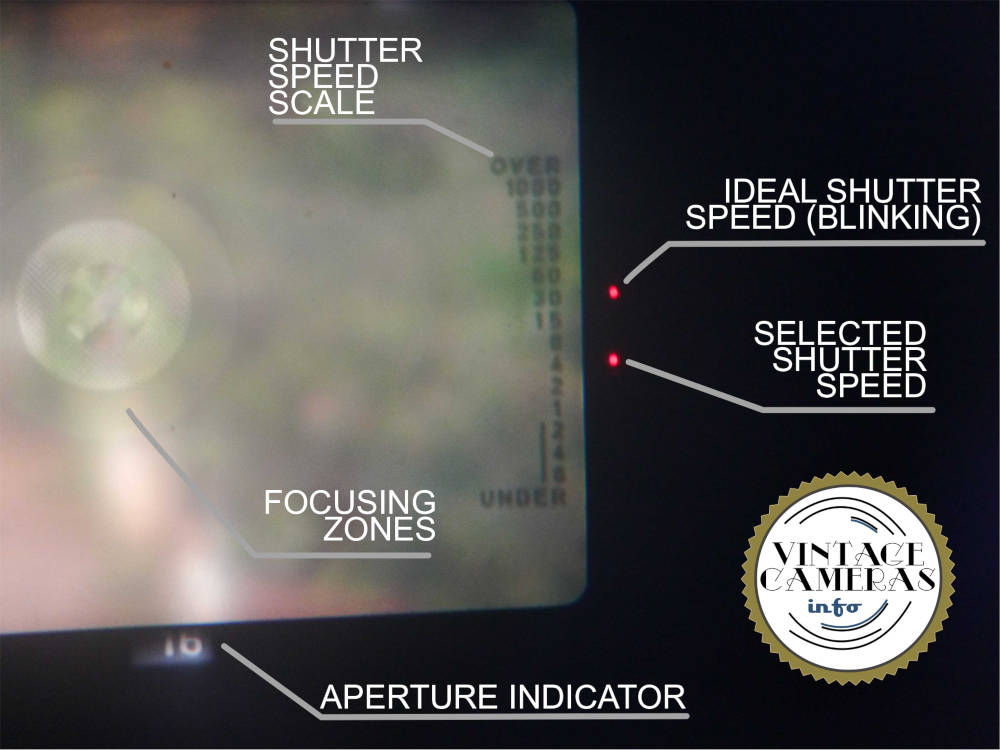
In aperture priority (or automatic) mode, a red LED on the shutter speed scale at the right side of the viewfinder screen will light up showing the shutter speed selected by the camera. To activate the LED indicator, press the shutter-release button until the first stage. If you press it further, the camera will shoot, so be aware.
In automatic mode, the camera can operate the shutter from 8 seconds up to 1/1000s. So, this camera can handle from night photography to noon sunny daylighting.
However, if it detects too much light, the LED will indicate the ‘over’ position, so you must close the aperture until the LED indicates at least 1/1000s. On the other hand, if it indicates ‘under’ it means there is not enough light and you should open the aperture if possible.
In any case, always check the shutter speed before shooting to make sure it is not slower than the inverse of your lens focal length to avoid motion blur. For example, for a 50mm lens, the shutter speed should not be below 1/50s. However, I always round up one step down and get away with it. For a 50 mm lens, it is safe to use 1/30s.
Manual Mode
In manual mode, both aperture and shutter speed are totally controlled by the user. To go into manual mode, select any speed value in the shutter speed dial except ‘automatic’, ‘B’, or flash (which is a lightning symbol, I guess).
Then, press the shutter-release down to the first stage so the LED will light inside the viewfinder. Now, the camera shows two LEDs. The blinking one is the ideal speed given the current aperture. The constant LED is the selected shutter speed. Use the shutter speed dial to match both LEDs.
The Bulb Mode
The Praktica B200 Electronic can operate as slow as 8s in automatic mode. However, for low light photos, the user may need much longer exposure times. In this case, the camera has a Bulb mode.
In Bulb mode, the shutter will remain open while the shutter-release button is kept pressed. You can maintain the shutter-release pressed for the time you want, and so will be the shutter. This feature allows any exposure time from seconds to hours or even days or months.
Along with the Bulb mode, it is advisable to use a shutter release extension cable, which is bolted to the trigger release button.
Exposure compensation
The Praktica B200 Electronic allows exposure compensation from -2 to +2 f-stops. To do so, press the exposure compensation release button next to the ISO dial. Then, turn the ISO dial to the desired position. Use this resource when photographing in automatic mode to compensate for lighter or darker backgrounds.
Focusing on the Praktica B200 Electronic
The focusing system of the Praktica B200 works in the same fashion as all other DSRLs. It has a split beam screen with four zones. The first one is the circle at the center of the screen.
This inner circle has three distinct parts, forming a split image if not on focus. Then, rotate the focusing ring back and forth until the three parts of the inner circle form one smooth image.
The following circles form fuzzy images when out of focus and will smooth out when correctly adjusted. A correct focus will imply in a sharp and smooth image all over the screen.
However, since the camera operation is done at full aperture to maximize the image brightness, you can preview the depth-of-field by sliding the button with an arrow on the right top side of the lens socket. You will notice the image will get darker and sharper.
How to load film in the Praktica B200 Electronic
Before trying to load film into your Praktica, take your time identifying and getting used to the inside parts of your camera shown in the photo below.

To load film in the Praktica B200 Electronic, follow these steps:
- Open the back cover by pulling the rewind crank knob up.
- Insert the film into the chamber and press the rewind crank knob down, so the rewind shaft will engage the film roll.
- Pass the film over the film rails and land its tip into the spool hole. You can turn the spool manually from left to right using the wheel at tis bottom. Make sure the film tip passes through the spool hole.
- Now, make sure the film holes engage the sprockets. You can turn the spool to stretch the film for best engagement. Make sure the film is engaged in both top and bottom sprockets.
- Close the back door.
- Press the shutter release button and pull the film advance lever. Repeat until the frame counter reaches the 1 position.
- Set the iso by pulling the ISO dial upwards while turning it. The selected ISo is shown on the ASA window.
- Done!
How to rewind and unload film in the Praktica B200 Electronic
To rewind and unload film in the Praktica B200 Electronic follow these steps:
- Press the spool release button at the camera bottom.
- Turn the rewind crank clockwise until you feel the film is free from the spool. If you are not sure, keep turning, at some point you will feel the film being freed.
- Open the cover and remove the film.
How to use the flash in the Praktica B200
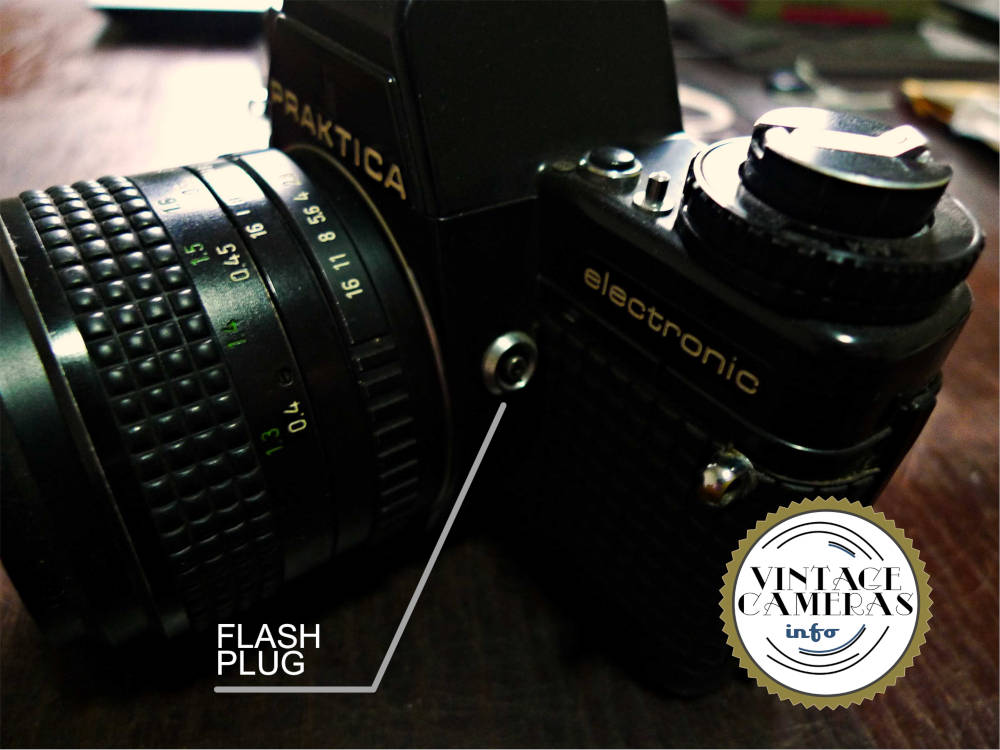
To use the flash in the Praktica B200, install it on the hot shoe or on the plug at the left side of the lens socket. Select the flash mode using the lightning icon in the shutter speed dial. Adjust the aperture according do your flash’s table.
How to use the timer in the Praktica B200 Electronic
To use the timer in the Praktica B200, follow these steps:
- Turn the timer winding lever 180° downards.
- Place the camera firmly, compose the photo, adjust focus and photometry or use the automatic mode.
- Press the button in the winding lever.
- Run!
How to install the lens in the Praktica B200 Electronic
To uninstall the lens in the Praktica B200 Electronic, press the lens release button and turn the lens barrel about one third of a turn counterclockwise.
To install the lens, align the red notch in the lens with the red notch in the lens release button. Offer the lens to the body and rotate it clockwise until it is locked.
Some photos with the Praktica B200 Electronic
Here are some photos I had taken with my Praktica B200 and Agfa Cinerex 50. It is a fine film and a fine lens combination. I will talk about this film in another article!


So, I think that’s it for the Praktica B200 Electronic Instruction manual. If this manual was useful, please share with your friends! Thank you for reading and see you soon!
The trick you give for the lr44 batteries is very nice!
Because the silver 6 v aren’t easy to find in opposition to thé lr44 that are frequently affordable in discount.shops.
Thanks a lot