In this article, I’m going to talk about one of my favorite 35mm SLR cameras, the Sears KS500. It is a very typical SLR, with all-manual controls and a very mechanical feel. It makes all the right pleasant clunks a machine of this kind should do, and this is precisely why I like it so much.
Also, since the Sears KS500 as made by Ricoh (it is based on Ricoh’s models KR-5 and XR-500), it uses the Pentax K-mount system, which means the tenses are compatible with the popular Pentax models. So, there are lots options under the Auto Sears name and other Pentax compatible brands.
There are lots of similarities with the Pentax K1000, both in design, features, controls, and overall feeling. It may also be considered a simple camera with basic functions, but it is absolutely adequate for most users. I sometimes prefer the KS500 over the K1000 because it is similar but have a better viewfinder, in my opinion. I also like the lock feature of the film advance lever.
That said, let’s stop the talking and go deep into this camera.
Basic controls
The Ricoh KS500 is a traditional SLR camera. At the top are present most of its functions, like the shutter speed dial, shutter-release button, frame counter, film advance lever, flash-hot shoe, ISO release button, rewind crank and ISO dial. So, almost all of your work will be done by the top!
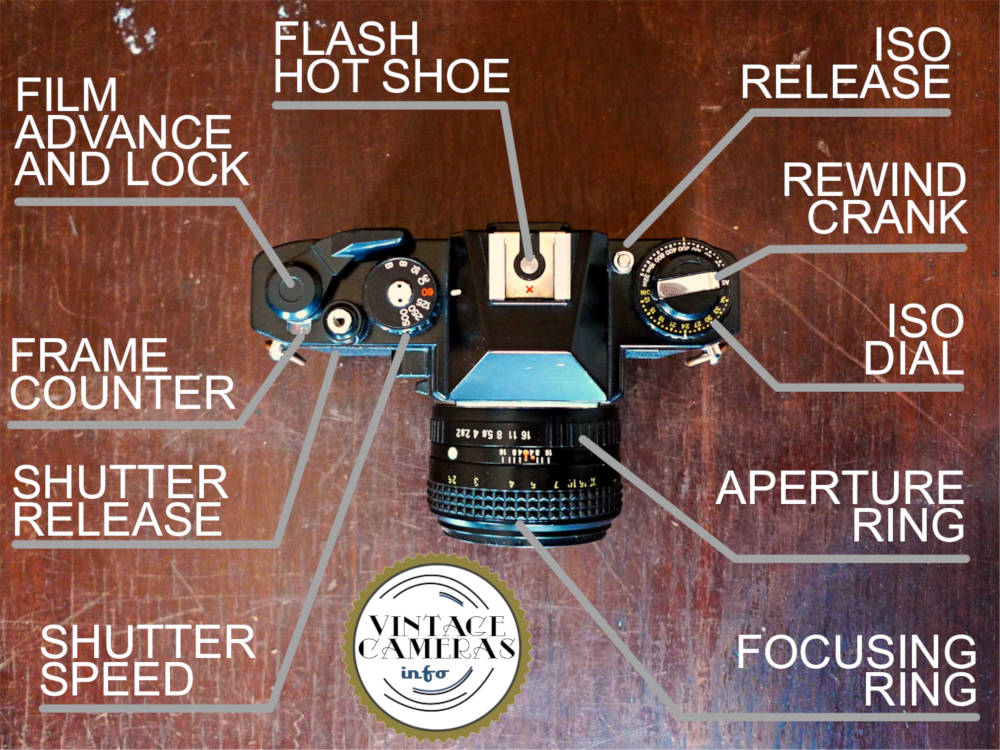
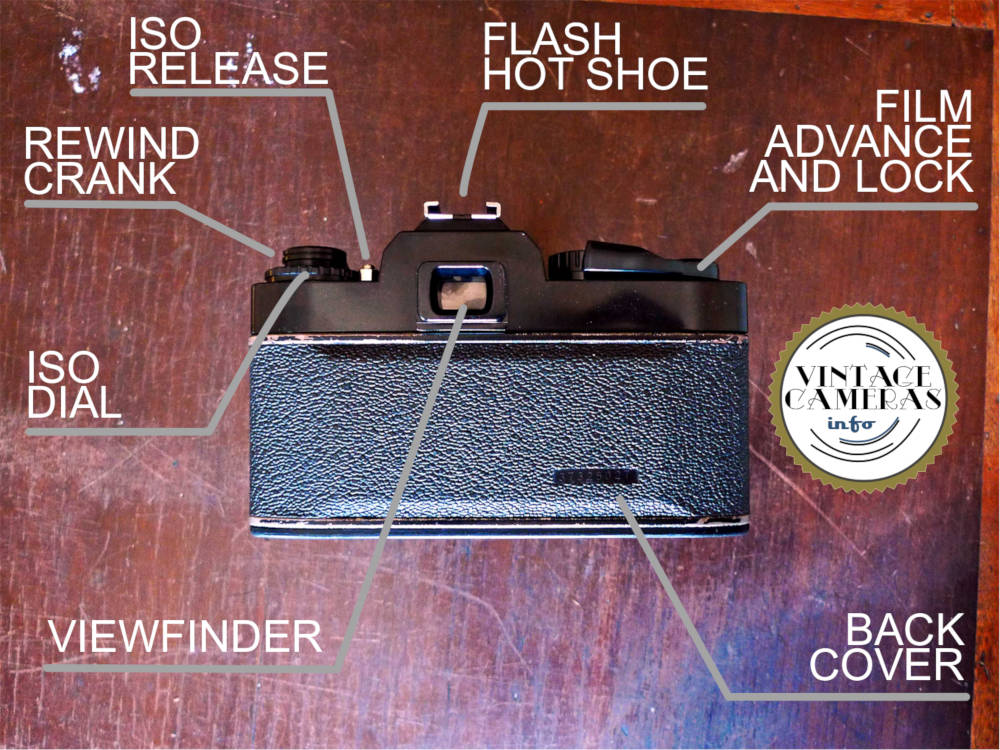
As usual in the SLR design, the focusing, aperture, and zoom rings are all in the lens barrel. At the back, of course, is located the viewfinder.
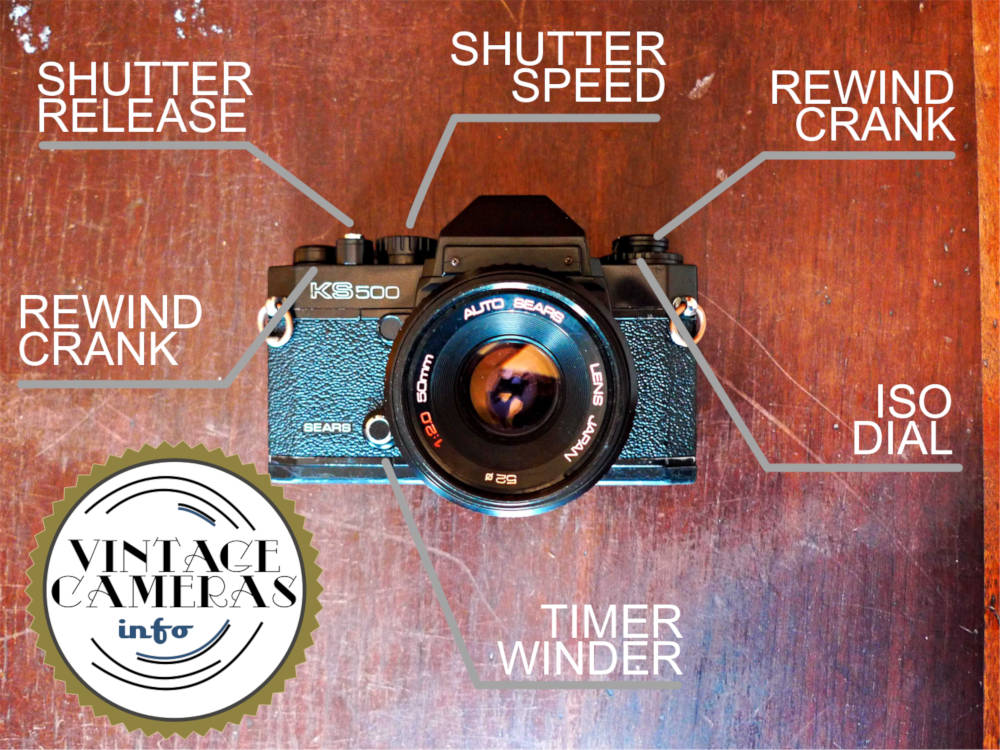
On the front, we find the rewind winder lever and the lens release button.
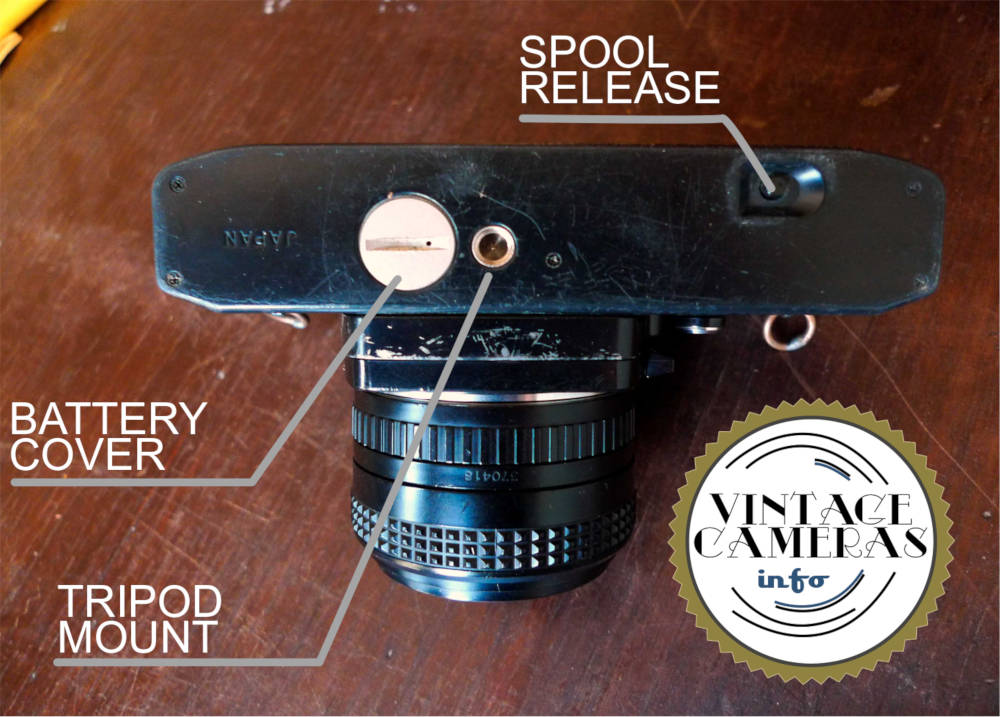
At the bottom is located the tripod mount, which is a standard 1/4″ thread, the battery cover and spool release button.
How to install the batteries in the Sears KS500
The first step in order to put your KS500 to work is to throw some new batteries in. To install the battery in the Ricoh KS500, use a penny to unscrew the battery cover at the bottom of the camera body. The cover is also a holder, so stack two LR44 batteries in the socket with the positive poles pointing up as shown in the image below.
Insert the cover/holder into its hole and them screw back using the penny. Don’t overtight it, though, because it is quite easy to damage the socket.

Photometry and shutter speed
The photometry in the Sears KS500 is quite peculiar, as we are going to see. To enable it, pull the film advance lever 90° clockwise. A red dot that was beneath the lever indicates the camera is ready to shoot. After a picture is taken, pull the lever to advance the film and return it to its original position to lock the camera and disable the photometry system. Don’t let your camera unlocked because it is going to drain the batteries.
Inside the viewfinder, there is a needle that indicates the light intensity. It moves as a function of the ambient light and also the lens aperture. When the user changes the aperture, the needle can go up to indicate more light is coming in, on move down to indicate less light.
Now, the shutter speed indicator is the one with this little circle at its point. As you turn the shutter speed dial, you are going to see this indicator going up as you increase the speed and down if speed is reduced. Makes sense, since we are going to need more shutter speed to compensate for more light and vice-versa.
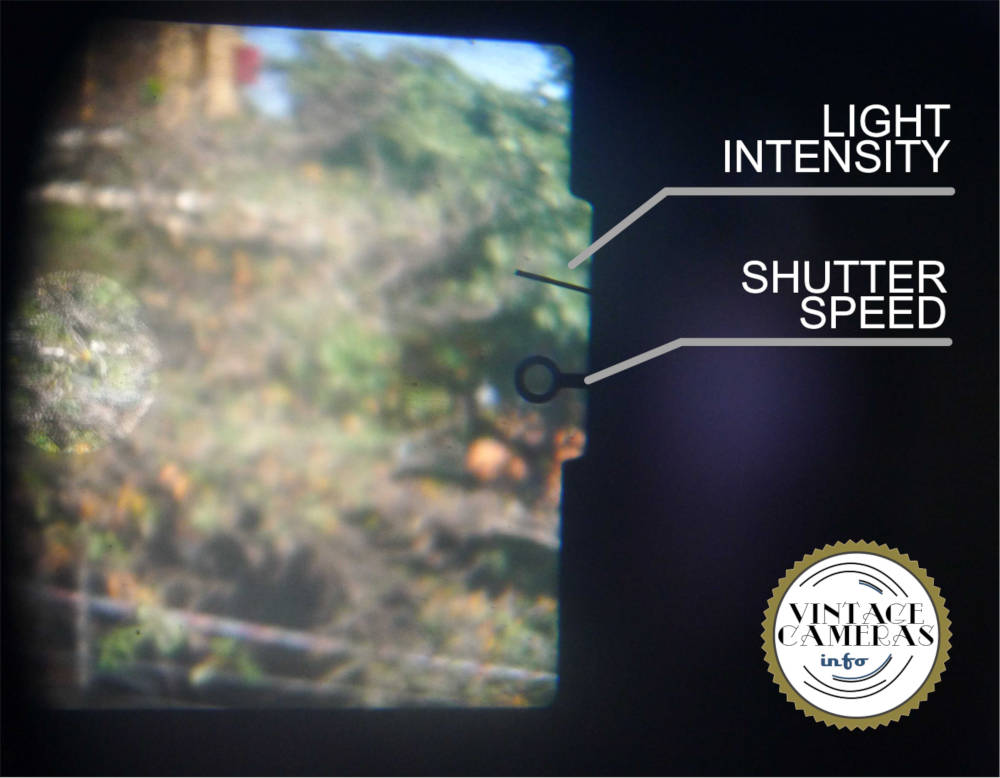
To achieve the ideal exposure, move the shutter speed dial until the circle matches the needle, as in the photo below. They won’t be a perfect match every time, so you must choose a bit under or over-exposed.
However, this is not critical since the film can usually handle a lot of f-stops of incorrect exposure and you are less than 1 f-stop away from the ideal value. Also, you may also use it to compensate for lighter or darker backgrounds as you need.

The Sears KS500 offers 7 shutter speed options from 1/8s up to 1/500s (hence its name) plus a Bulb mode, which we are going to talk about in the next session.
I consider this range of speeds appropriate for most applications. Some people may say that lacking a 1/1000s shutter speed is the difference between an amateur and a professional camera of this time. It may be true, though, but it doesn’t mean the Sears KS500 isn’t a capable camera, as nothing would be farther from the truth than this.
As I had already pointed out in the Zenit 122 manual, this range of speeds is what most situations would require. You are rarely going to use less than 1/30s to avoid motion blur and 1/1000s would be rarely needed, too.
Bulb Mode
The Sears KS500, although it doesn’t have slower shutter speeds, is featured with a Bulb mode. In Bulb mode, the shutter is maintained opened while the shutter-release button is kept pressed. This way, very long exposure times, such as minutes, hours or even days, can be achieved with this camera.
To select the Bulb mode in the Sears KS500, put the shutter speed dial into the ‘B’ position. The Bulb mode is useful for night or low-light photography. Also, you may consider using a tripod and a shutter release extension cable in these cases. The shutter release extension can be simply screwed into the shutter-release button.
Focusing in the Sears KS500
The focusing system in the Sears KS500 is a standard SLR split prism design. It has two circles in the middle of the viewfinder screen as in the image above. The inner one is the split prism, in which two images will form if the subject is out-of-focus.
To find the correct focusing distance, turn the focusing ring of the lens back and forth until the upper part of the image matches the bottom in the center ring. When the image is correctly focused, both halves of the inner circle form one continuous image.
There is also another circle that forms a fuzzy image if out of focus. When in focus, the image appears smooth all over the circles and the entire screen.
How to load film in the Sears KS500
To load film into the Sears KS500, follow these steps:
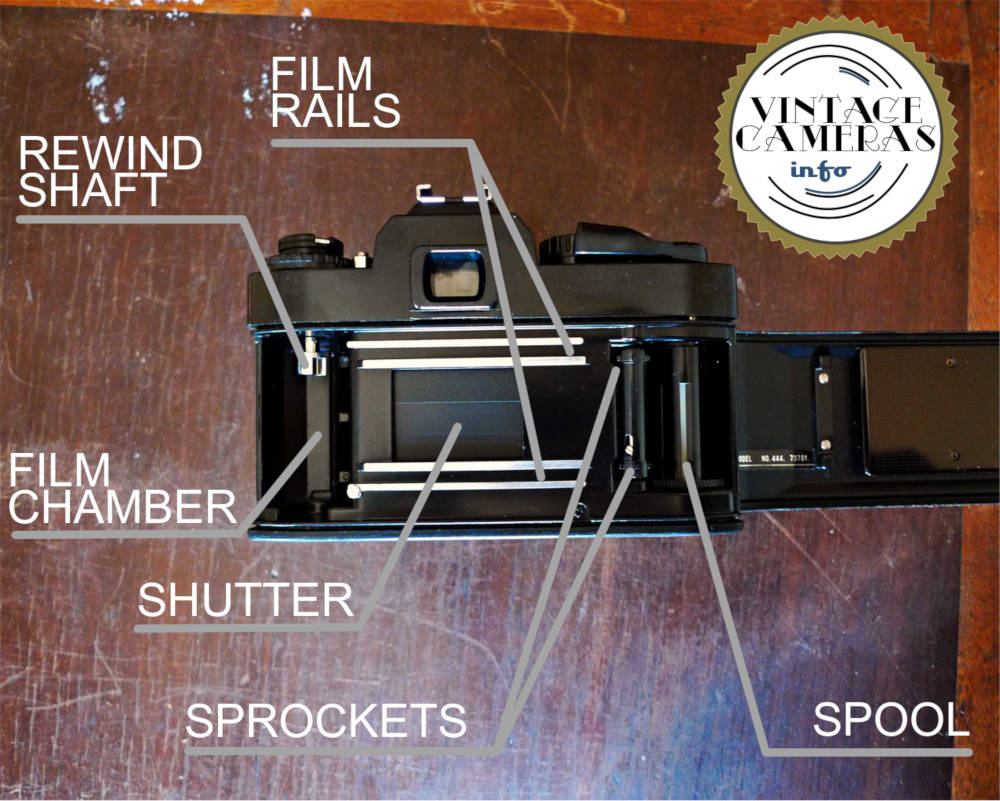
- Open the back cover by pulling the rewind knob up.
- Insert the film roll into the chamber.
- Push the rewind knob, so the rewind shaft engages the film roll.
- Pass the film over the rails and insert its tip into the spool hole. Make sure it is firmly engaged.
- Now, turn the wheel into the bottom of the spool from left to right to pull the film.
- Engage the film holes with the sprockets. Make sure both sprockets are engaged. You can use your finger to help the film engage the sprockets.
- Close the back cover.
- Press the trigger release button and pull the film advance lever.
- Repeat until the frame counter display the number ‘1’.
- Now, press the ISO release button and turn the ISO selection ring to adjust the corresponding film ISO.
- Done!
How to rewind and unload film in the Sears KS500
To rewind and unload film in the Sears KS500 follow these steps:
- Press the spool release button in the bottom of the camera body.
- Turn the rewind crank up (not the knob, just the crank).
- Turn the rewind crank clockwise until you feel the film is free from the crank.
- Pull the rewind knob up and remove the film from the chamber.
- Done!
The Sears KS500 uses Pentax K-mount lenses
Since those cameras are made by Ricoh, which is the owner of Pentax for a long time, they use the K-mount platform lenses. So, there are lots and lots of amazing lenses that are compatible with those cameras bodies. All the classic SMC Pentax can be used with the KS 500.
So, installation of lenses is exactly the same process as in Pentax cameras. To remove the lens of the Sears KS500, follow these steps:
- Press the lens release button in the bottom-left side of the lens socket, next to the timer winder lever.
- Turn the lens barrel aproximately 1/4 of a turn counterclockwise until it is free.
- Pull the lens gently out of the socket. It must come out effortlessly.
Installation of lens in the Sears KS500 is the reverse process:
- There is a red dot in lens socket and one in the body. Align them.
- Offer the lens to the camera, it must enter the socket effortlessly.
- Turn the lens barrel clockwise about 1/4 of a turn until you feel the lens lock is engaged.
How to use flash in the Sears KS500
To use flash in the Sears KS500, install it in the flash hot shoe at the top of the body. Adjust the shutter speed to ’60’, which is marked in red at the dial, indicating it is the synchronous speed. Now, adjust the aperture according to you flash application table. The Sears KS500 doesn’t have a flash plug, only yhe hot shoe.
How to use the timer in the Sears KS500
The timer of the Sears KS500 is remarkably easy to operate:
- Place the camera firmly somewhere, or use a tripod.
- Do the composition, adjust the focus and the exposure as usual. Make sure the camera is ready to shoot.
- Turn the timer winder 90° counter clockwise.
- Press the shutter release button and run!
And that’s it for the Sears KS500 instruction manual. If it was useful, please share with your friends! Tahnk you for reading!