Originally posted on my disabled blog VintageCameras.info
The Yashica FX-D Quartz is an SLR introduced in 1980. One of the greatest features of this camera is the Aperture priority mode. As opposed to other models of the time, such as the Pentax ME, it can already shoot in full manual mode. The Yashica FX-D also has some other interesting features, as I will show in this instruction manual.
Also, the shutter speed, synchronization, and timer are all electronically controlled, hence the name ‘Quartz’. This gives this camera a greater precision as compared to mechanically operated cameras such as the Pentax K1000 and the Zenit 122.
Since it is lightweight and compact, this is a good camera to carry around. Ergonomics are good and the photometer switch, which has a very unique configuration in this camera, is placed in a way it can be reached without repositioning the hand. I will give more details along with this manual.
Basic Controls
The Yashica FX-D Quartz isn’t much different from other SLRs of its time in terms of controls, but let’s have a look at them before we move on with this instruction manual.
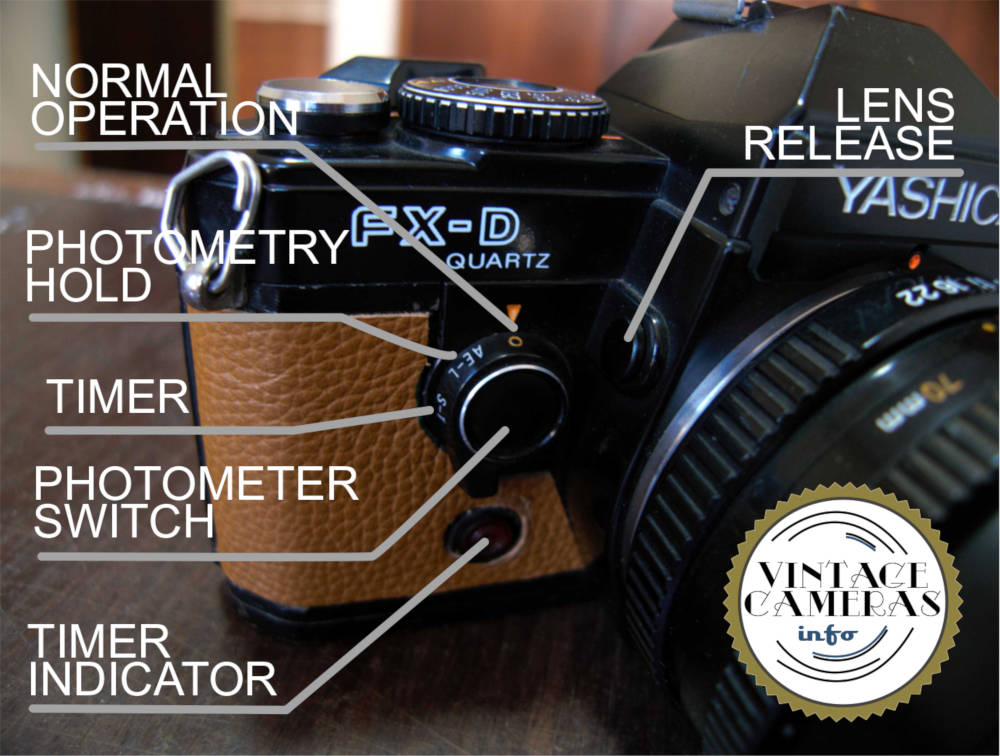
At the front of the camera body, there is its most unusual feature which is the photometer switch and a selection lever next to the lens release button.
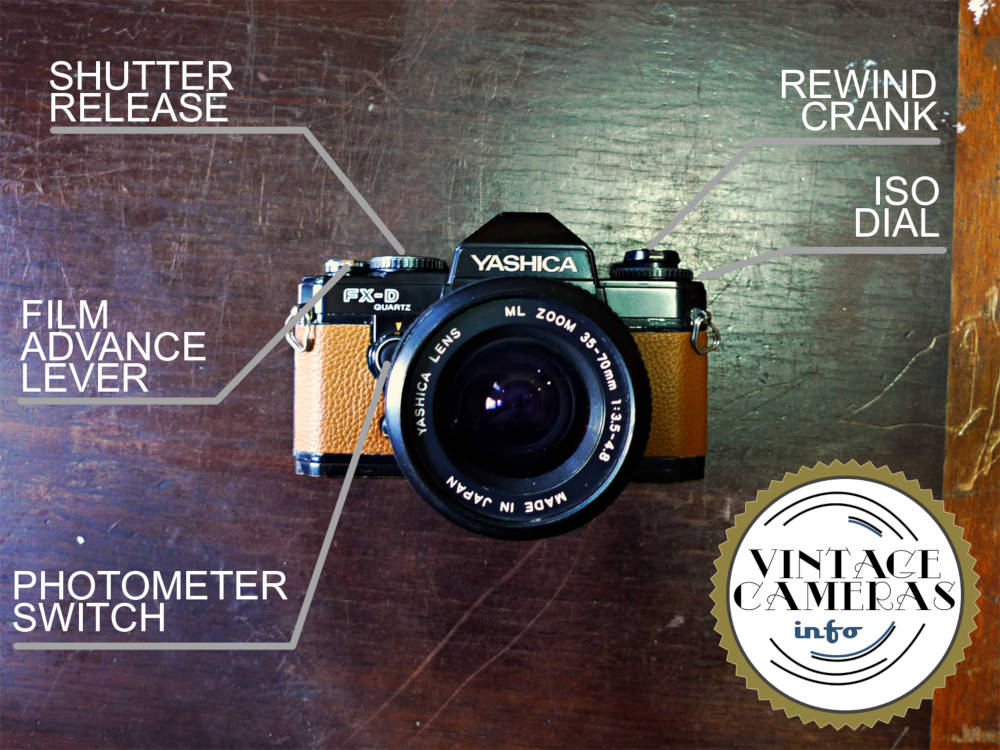
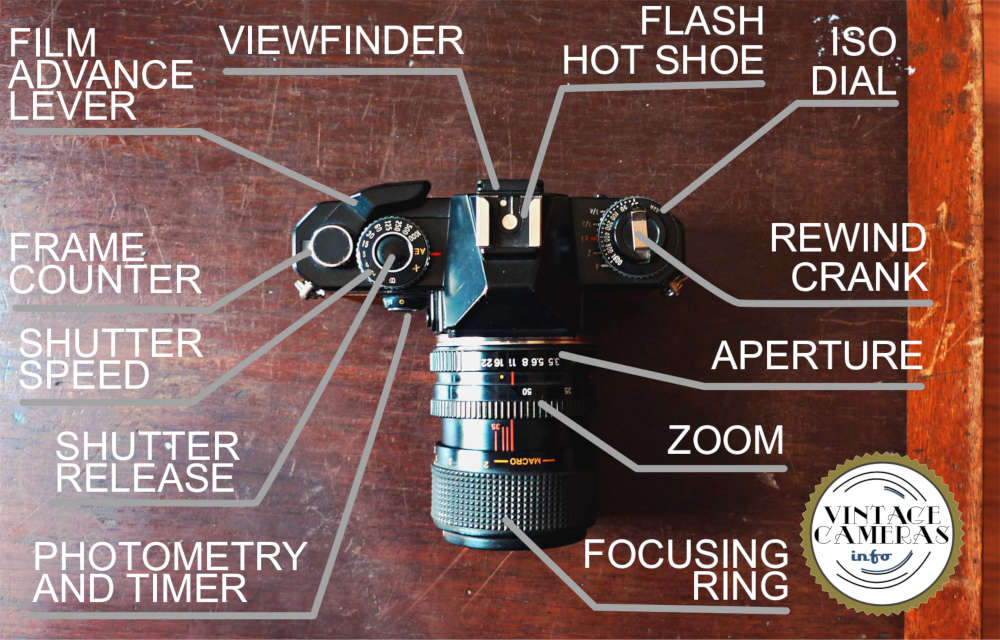
The aperture, focusing, and zoom controls are present in the lens, as expected. Flash hot-shoe, shutter velocity dial, rewind crank, film advance lever, and ISO dial are present at the top f the body, as usual.
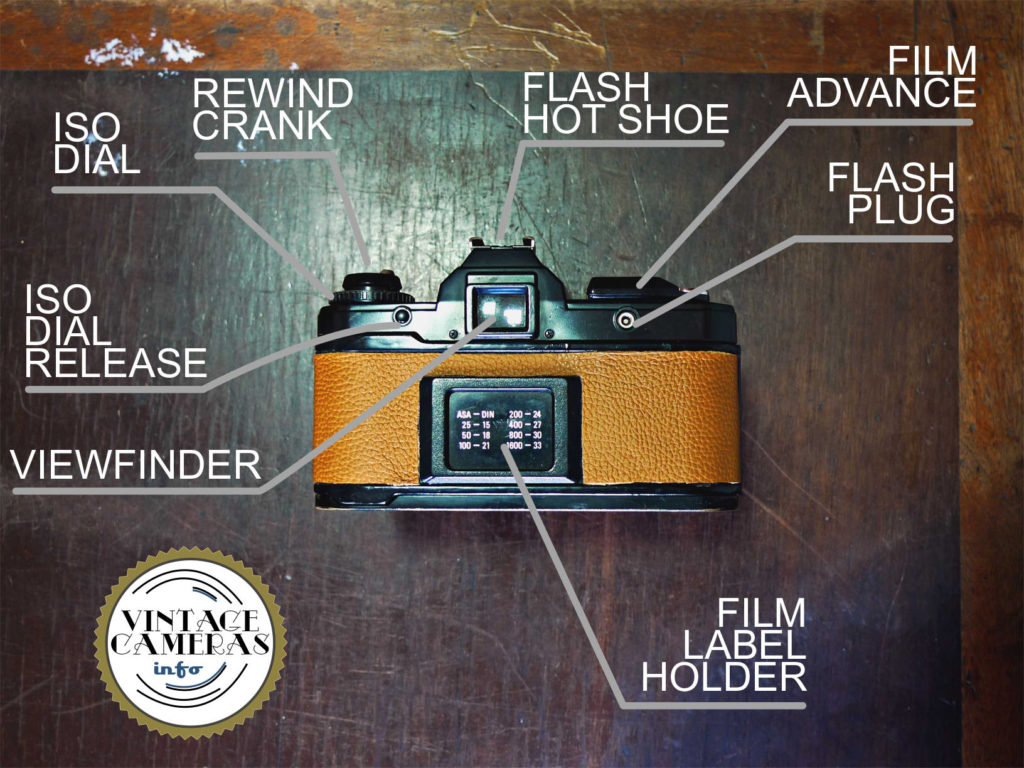
At the back, it has a flash plug and an ISO release button. A nice feature is the film label holder. You can insert the top of the film box there, so you will always know what film is loaded in. In more modern cameras this was replaced by an inspection window at the back cover, but it is not as safe as the method used in this Yashica.
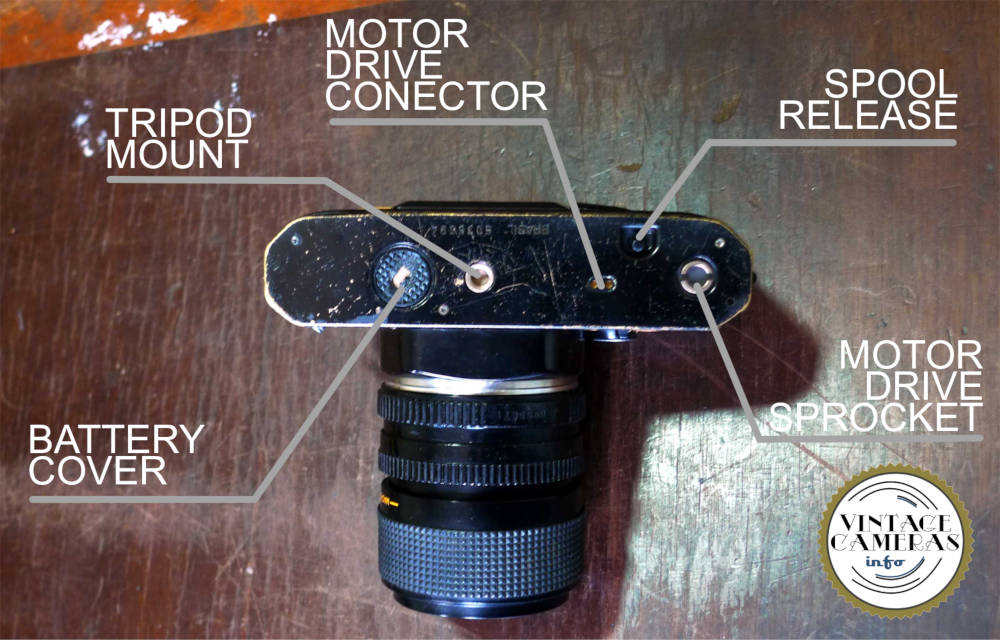
The bottom contains the batteries, a tripod screw mount, the spool release button, and motor drive provisions. I recovered this camera from a junk pile, so the leatherette wasn’t in good shape and I replaced it by this leather.
How to install the batteries in the Yashica FX-D Quartz
Let’s begin our tutorial by installing the batteries in the Yashica FX-D, as I always do in any instruction manual. To do this, follow these steps:
- Use a penny to unscrew the battery cover on the bottom of the camera.
- Insert the batteries into the cover, pay attention to the indication of polarity. The Yashica FX-D uses two regular LR44.
- Screw the battery cover back.
A piece of advice here is that the cover is made of a soft plastic that can be easily damaged, so be aware. I couldn’t take photos of mine because if I remove I am quite sure it will be destroyed. So, take great care here. It is a design flaw.
Photometry
The next step towards taking photos with your Yashica FX-D is understanding the photometry system. This camera can operate in two different modes: manual and aperture priority.
For both modes, the photometry system is activated pressing the switch at the front of the camera, as indicated in the image below. Also, make sure the lever around the photometry switch is on the ‘o’ position.
When holding the camera in a natural position, this switch can be easily reached by the middle finger. After pressing the switch, some LEDs will light on the right side of the viewfinder indicating the camera is operating. The camera turns itself off automatically after some 30 seconds.
Yashica FX-D shooting modes
The Yashica FX-D can shoot in aperture priority mode and manual mode. I have used it only in aperture priority and it does a really good job! I rarely bother going manual in this one and it is one of the things that make me like it a lot!
How to use the aperture priority mode in the Yashica FX-D
In aperture mode, which is selected using the ‘AE’ position of the shutter speed dial, the user sets the aperture using the corresponding ring in the lens and the camera adjusts the shutter speed accordingly. It will beep if the scene is over- or under-exposed.
The camera will indicate the shutter speed through a LED on the right side of the viewfinder. If you consider the shutter speed is adequate, press the shutter release button. If not, try changing the aperture until a suitable shutter speed is achieved.
Photometry in the Yashica FX-D can be as simple as this.
How to use the manual mode in the Yashica FX-D
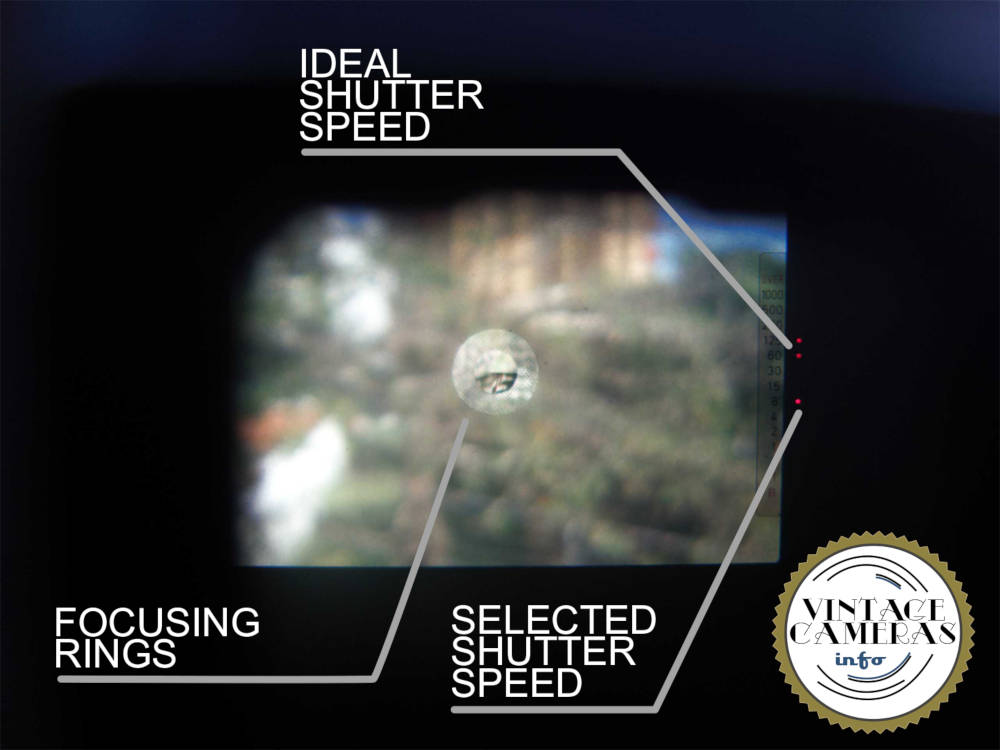
On the other hand, If the shutter speed dial is at any position other than ‘AE’, ‘B’ and ‘X’, the Yashica FX-D will operate in manual mode. In this case, the user must set the aperture and shutter speed while the camera indicates the ideal shutter speed.
For best understanding, let’s have a look in the image below. The ideal shutter speed is represented by constant lighten LEDs. Sometimes it will light one LED and other times two of them, which means that there are two shutter speeds that are adequate and the user can choose use any of the two comfortably. The selected shutter speed is represented by the blinking LED. Turn the shutter speed dial until it matches the constant LEDs or set it under- or over-exposed as you wish.
Exposition locking
Let’s say you want to take the photometry at one point and shoot in another. In this case, aim the camera at the subject you want and adjust the exposition parameters as usual.
While in aperture priority mode, switch the lever around the photometer switch to the ‘AE-L’ position. Now you can move the camera while the exposure is locked. After finishing, return the lever to the ‘o’ position.
Shutter Speed and Bulb mode
The Yashica FX-D has a good selection of shutter speeds ranging from 1s to 1/1000s, which are suitable for most situations. The shutter speed is selected using the dial at the top of the body and it affects the shooting mode as explained in the previous section.
The Yashica FX-D low shutter speeds are useful when making stills using a tripod and some weak illumination. However, for night photography, the best solution is to use Bulb mode.
In Bulb mode, the shutter is kept open while the shutter-release button is pressed. It closes when the shutter button is released. Using this mode, any long time exposure can be done easily.
However, the Yashica FX-D doesn’t provide a way to connect shutter release cables to its shutter button, so it must be done by hand, which can introduce vibrations. I would not recommend this body for night photography, though.
Focusing in the Yashica FX-D
The focusing system in the Yashica FX-D is very similar to all other SLRs of its time, consisting of a split-beam system at the center of the viewfinder, as can be seen in the image above where I show the photometer.
The central inner circle generates a split image of the subject when out of focus. Rotate the focusing ring back and forth until the images at the top and bottom matches. When this happens, you are in focus.
When there is less light, it is difficult to use the inner circle. For this reason, there is that other circle around it, which generates a coarse image when out of focus. Rotate the focusing ring until it forms a smooth image. The same goes for the rest of the viewfinder screen. When you are in focus, the image is sharp at any part of the screen.
How to load film in the Yashica FX-D
Now that we know the entire process of photographing with the Yashica FX-D, we can throw some film in. To load film in the Yashica FX-D, follow these steps:
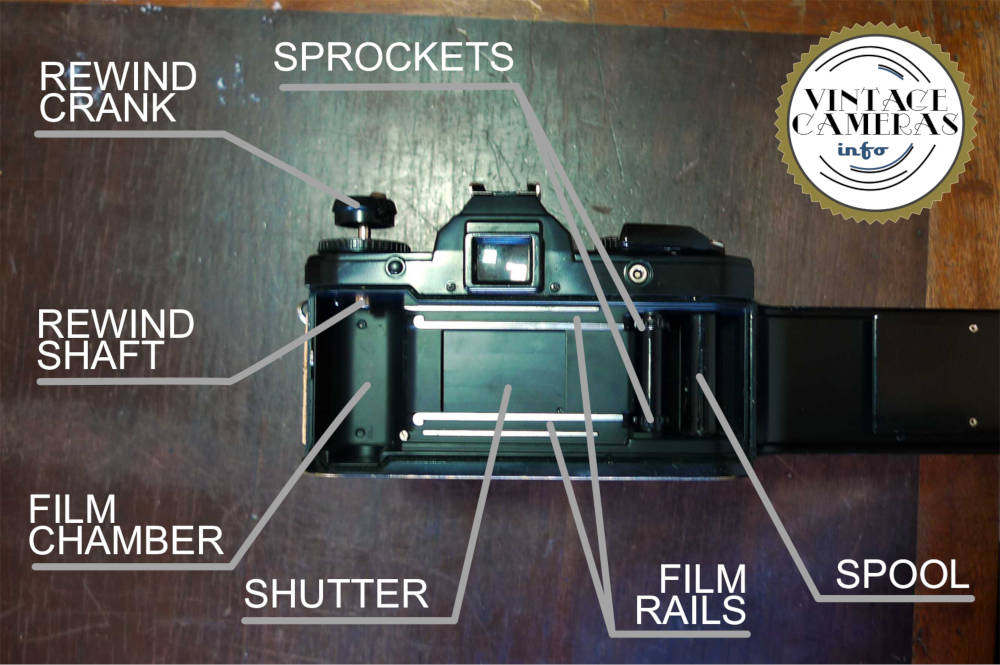
- Open the back cover by pulling the rewind crank knob up.
- Keep the rewind crank knob pulled while inserting the film into the chamber to keep the rewind shaft out of the way.
- Push the rewind knob so the rewind shaft will engage the film roll.
- Pass the film over the rails and land its tip inside the spool hole. Make sure it passes through and is firmly engaged.
- You can rotate the spool from right to left to stretch the film using the wheel at the bottom of the spool.
- Now, the film must engage the sprockets. You can give a little help with your fingertips.
- Close the back cover and press the shutter release button.
- Advance the film using the lever.
- Press the trigger and pull the film advance lever two times until the frame counter indicates ‘1’.
- Always make sure the rewind crank rotates while the film is advanced, which means the film has successfully engaged the sprockets. If it doesn’t happen, you must open the back cover and start all over again.
- Finally, set the ISO as I will describe in the next session.
- Have fun (but continue reading the Yashica FX-D instruction manual until the end)!
How to set the ISO in the Yashica FX-D
The ISO is set using the corresponding dial at the top of the camera body. However, it must be unlocked by pressing the ISO release button at the back of the camera. It ranges from 25 to 1600 with two steps between each ISO for fine adjustment.
Exposure Compensation
Note that there is a red ‘x1’ mark which means the ISO is not compensated at this position. If you want to over-expose a bit, put the corresponding ISO of yout film into ‘2’ or ‘4’. To under-expose use ‘1/2’ or ‘1/4’.
ISO calibration
Unfortunately, all cameras must have some ISO miscalibration over time due to the aging of electronics and optics. While the definitive solution involves replacing parts, it is not always desirable or economically viable. In those situations, however, there is a solution.
I calibrate all my cameras using the sunny 16 rule. To this, I apply the rule on a sunny day with f/16 and turn the ISO dial until the photometer indicates the ideal shutter speed.
How to rewind and unload film in the Yashica FX-D
To rewind unload film in the Yashica FX-D, follow these steps:
- Press the spool release button at the bottom of the camera body.
- Rewind the film until the end using the rewind crank.
- Keep cranking until you feel the film is free from the spool.
- Open the back door and remove the film.
How to use the flash in the Yashica FX-D
To use the flash in the Yashica FX-D you simply mount it in the hot-shoe or use the flash plug at the back of the camera. Then, select the ‘X’ in the shutter speed dial. Set the aperture according to the specifications of your flash and you are good to go!
How to remove and install lens in the Yashica FX-D
To install lens in the Yashica FX-D is the simplest part of this instruction manual, just follow these steps:
- There is a red dot at the top of the camera’s lens socket and a corresponding one at the lens.
- Line the red dots and offer the lens to the camera, it should engage without force. Wiggling the lens a bit can help.
- Rotate the lens clockwise until you hear a click, which means the lens is locked in position.
To remove the lens in the Yashica FX-D, follow these steps:
- Press the lens release button located at the side of the lens mount.
- While keeping it pressed, rotate the lens about 90° counter-clockwise until you feel it is free.
- Pull the lens gently. It should go out effortlessly
As I always say, be careful to not touch the glass parts with your fingers since you will need to clean them if this happens.
How to use the timer in the Yashica FX-D
To use the timer in the Yashica FX-D, move the selection lever that is around the photometer switch to the ‘S-T’ position. Place the camera firmly, compose the scene, set the shutter speed manualy or using the aperture priority mode and press the trigger release button.
The camera will beep and the LED just below the lever will blink indicating it is going to shoot. It will increase the rhythm of the beep and LED when it is about to shoot.