Originally published on my disabled blog VintageCameras.info
The Zenit 122 is an SLR camera original from the Soviet Union. It is estimated that, in total, 1,8 million were made, so they were, and still are, very popular cameras. They are remarkably simple in terms of features and mechanics, but a bit more complicated to use when compared to their Japanese counterparts. Since they are so popular, I thought the Zenit 122 would deserve a thorough instruction manual.
In my collection, I currently have two Zenits. The other is a 12 XP. Both came with the celebrated Helios 44m lens and were dirt cheap, especially because I bought both in Brazil, and they had cost me about 20 bucks each, in mint condition with bags and accessories.
All in all, it is a good photography machine for those starting in the art of film photography and a step higher than rangefinders such as the Olympus Trip 35. If anyone asks me what is a Zenit 122, I would say ‘a machine made for photography’. This is exactly what it is, a purely mechanical device designed for exposing a photographic film. That is also why it is one of the most fun cameras you can have!
There may be some other more interesting options in the entry-level market out there, such as the Pentax K1000, but for its price, I think it is almost unbeatable, especially because of the lens, a legendary piece of engineering whose origins are in Zeiss designs of the Eastern Germany Republic. The boxy design is also unique and distinctive, ergonomics are as good as anything designed in the 60s.
All that said, let’s go deep into this piece of the other side of the iron curtain.
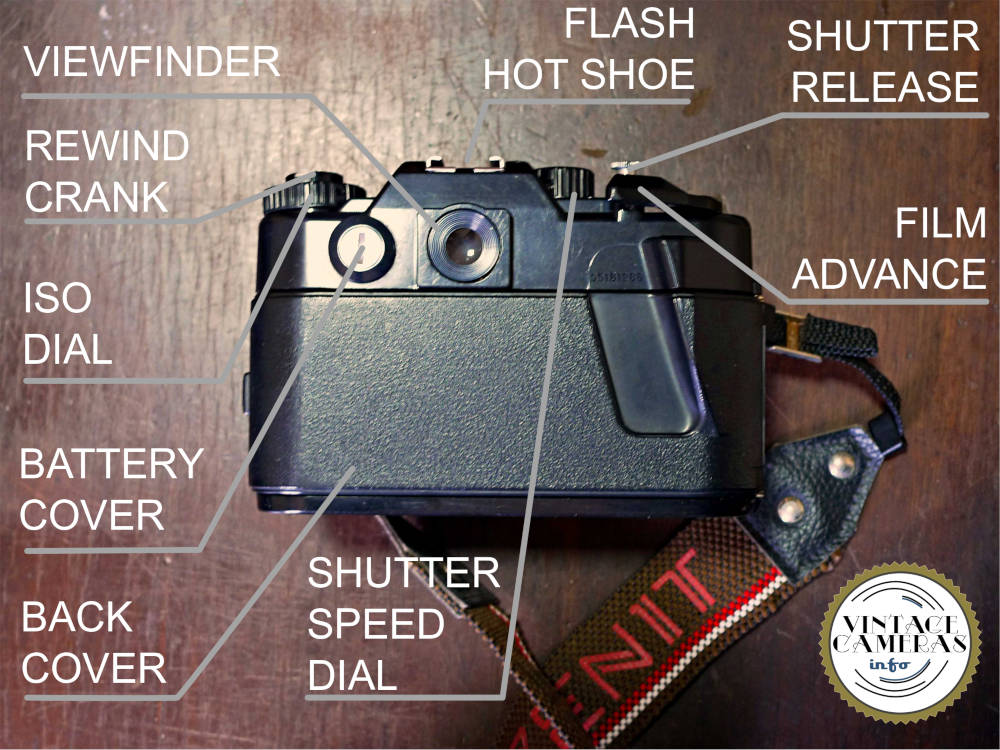
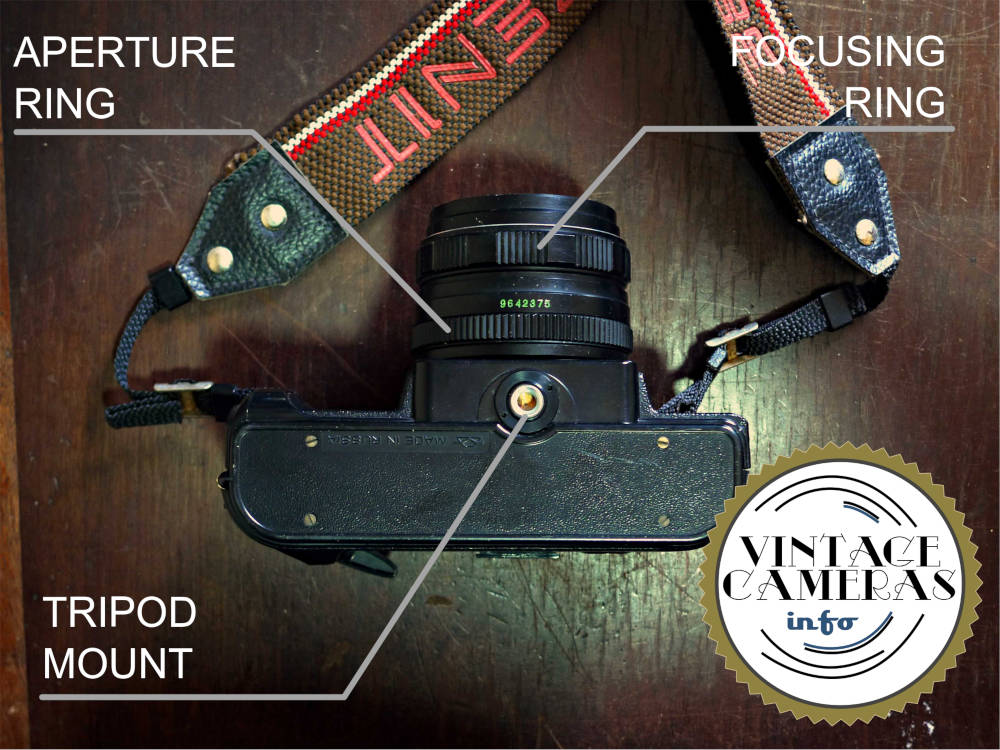
Parts of the Zenit 122
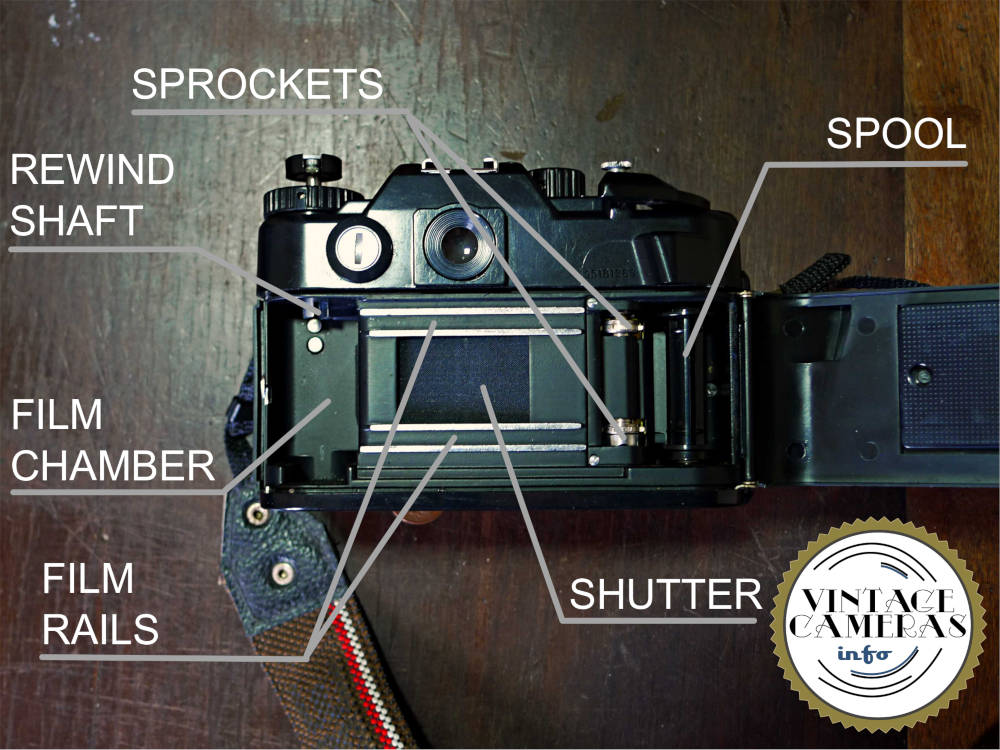
In the photos below, all the main parts of the Zenit 122 are shown from all sides and inside. Now is a good time to grab your camera and get used to it because we are going to talk about all those parts of the Zenit 122 for the rest of this instruction manual.
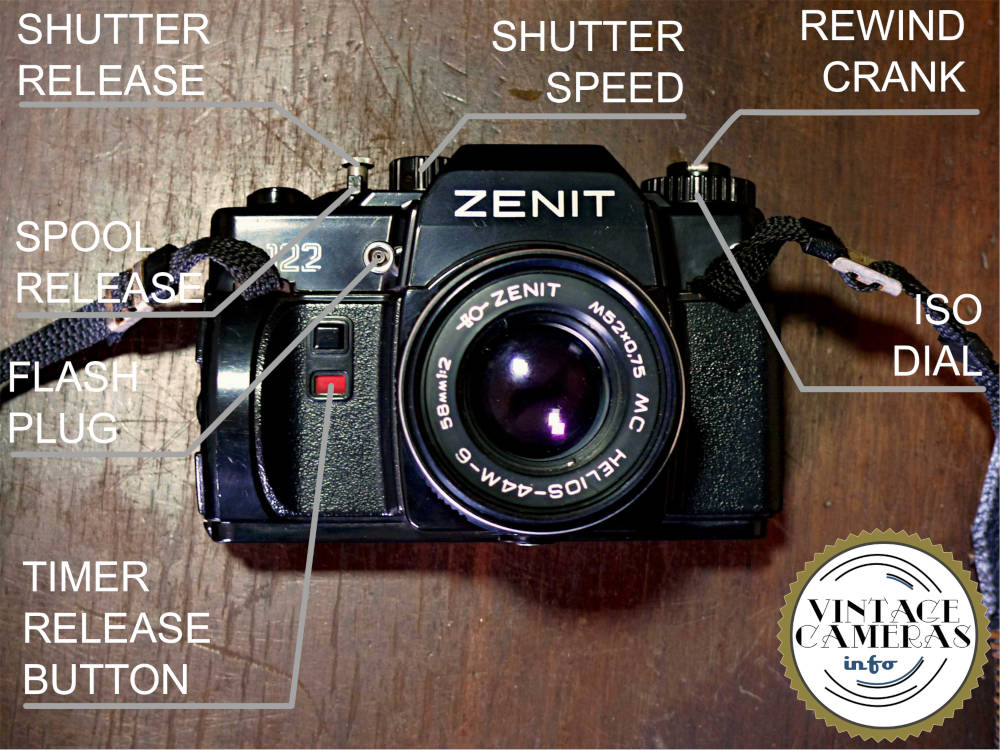
The Zenit 122 has all the usual commands that a typical manual camera of the 60s has. The most important things you are going to use all the time is the shutter speed dial, the aperture ring, the focusing ring, the viewfinder the shutter release button, and the film advance lever. Those are the basic commands for shooting photography.
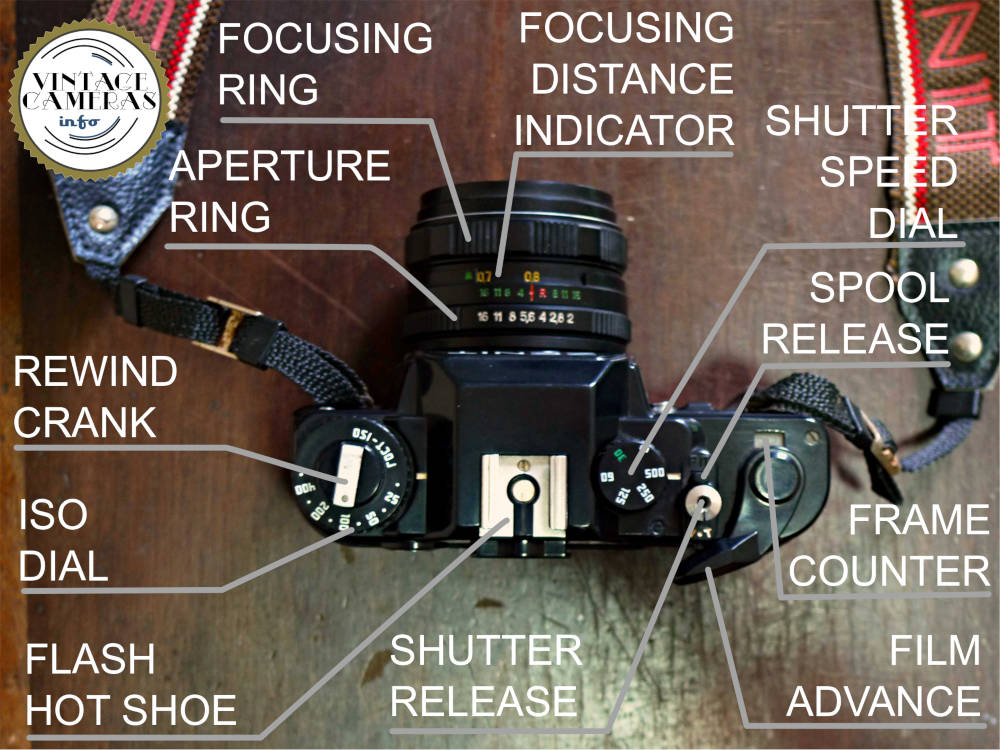
Have a good look and try to memorize the basic stuff because we are going to use them a lot.
Putting batteries in the Zenit 122
Let’s begin this instruction manual by the first thing we need in order to get your Zenit 122 running: putting batteries in it. To install the batteries, just follow these steps:
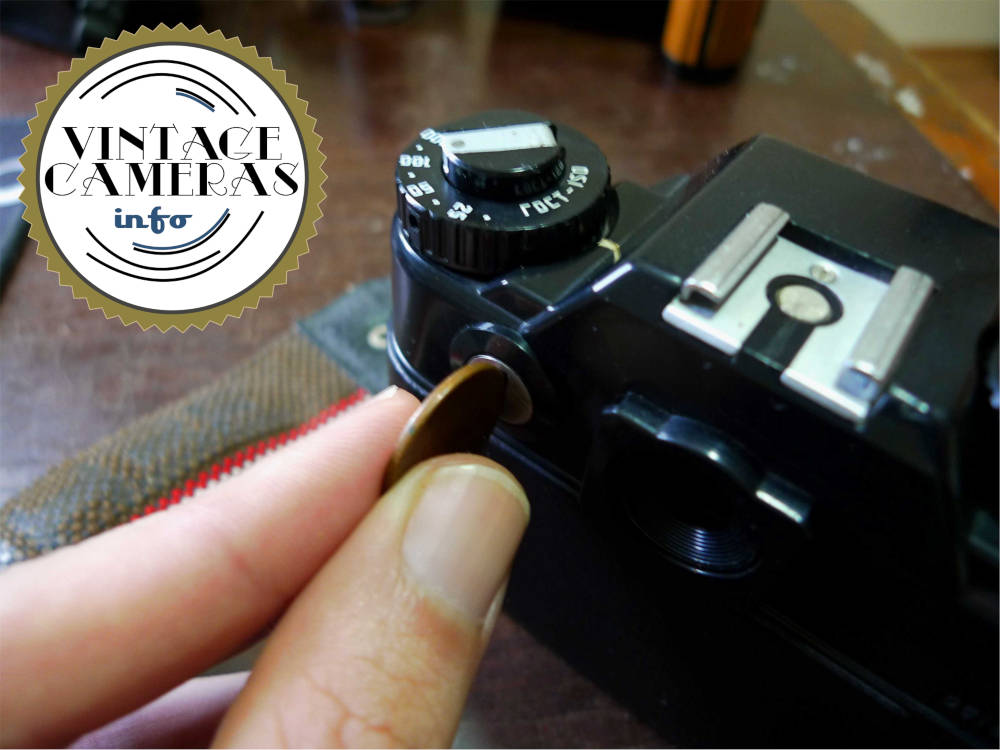
- Use a penny to flip the battery cover at the back of the camera, as shown in the image above. It may be free with a 90° counter-clockwise turn.
- Since the battery cover has a spring-loaded, it will be ejected when pressure is released, so be aware.
- Now you can remove the old batteries.
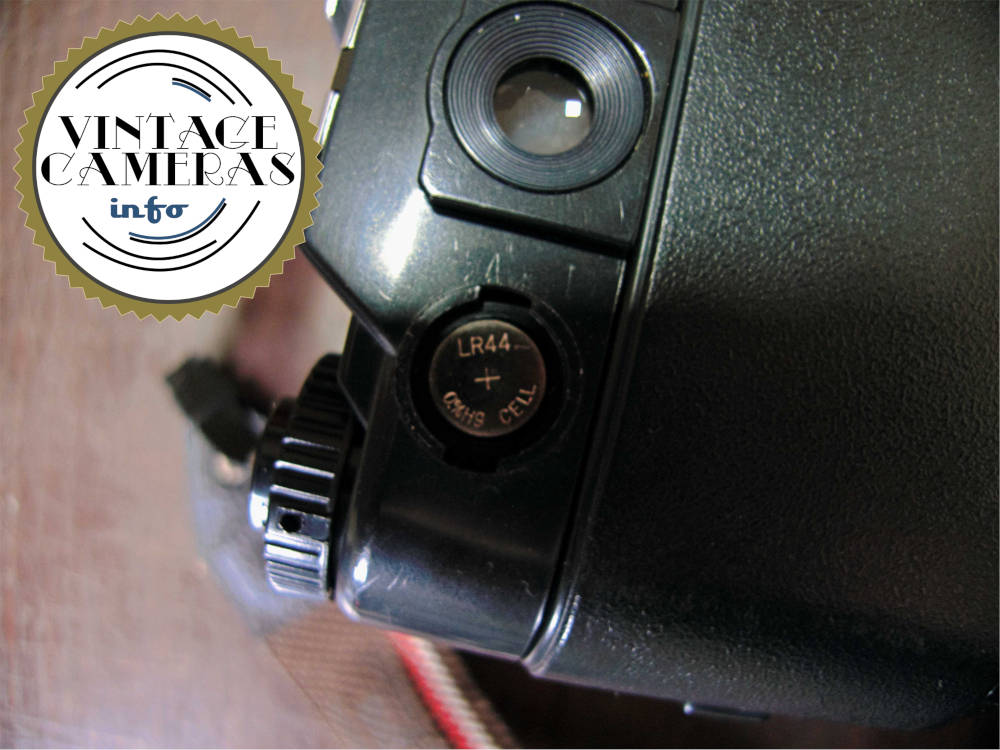
- Install the new batteries with the positive poles pointing out of the camera, as in the photo below.
- It uses two regular LR44s batteries. Sometimes it can be difficult to fit them, so you can use an LR44 and an LR1130. If they are loose inside the chamber, you can insert some tin foil between them until the cover has adequate pressure.
- Insert the battery cover in the same orientation as it was before and close it turning 90° clockwise.
The photometry
Now that your Zenit 122 has good new batteries, let’s turn it on and learn how to use its photometer. To do that, just depress the shutter release button until you fill some resistance. This happens because it actuates the lens aperture.
If you look at the front of the lens while pressing the shutter release, you are going to see the aperture closing. Keep it depressed in this position while doing the photometry.
Then, look through the viewfinder and press the shutter release until you feel the aperture closing. If the electronics of your camera are working, you are going to see some LED lights on the right side of the screen. There are three LEDs inside the viewfinder. The top red one indicates overexposure, the bottom red indicates underexposure and the green is ideal exposure.
Take your time aiming the camera at different sources of light and tinker with the shutter velocity and aperture dials. Learn how to reach the sweet spot of the green light before putting film and hitting the street. It is totally worth spending this time since it is the trickiest part of using this soviet machine.
Now that you know how to find the ideal exposition parameters, let’s move on to the basics of focusing.
Focusing with the Zenit 122
The focusing system of the Zenit 122 is pretty much similar to all cameras of the time, so if you have some experience with other cameras it will be really easy. The viewfinder of Zenit 122, in my opinion, is very nice and easy to use.
The screen of the Zenit 122 has 4 zones. The smallest inner circle in the middle is the most useful since it is a split-beam optics that will converge if you are in focus. This means that when you are out of focus the bottom and the upper parts of the image won’t match.
Now, rotate the focus ring of the lens until you find the perfect match. Do that without pressing the shutter release, so you’ll get the minimum depth of field which will make the adjustment much more precise and refined.
The other two circles are arrays that will become a fine image when it is on focus. The same goes for the fourth zone, which is the rest of the screen. When you are in focus, the image will be sharp all over the screen.
Now it is a good time to depress the shutter release button halfway because it will close the aperture and you can check the background blur, for example. If you desire more blur, open the lens, if you want more sharpness, close it.
You can do it while the shutter is depressed and looking through the viewfinder, so you can see it in realtime. When you decide all is good enough, search for the best shutter speed to optimize the exposure and you are good to shoot.
Shutter speed and Bulb mode
Some people complain about the lack of low and high-speed settings of this cameras, but I think it is really adequate for most purposes. They range from 1/30s, which is the flash synchro speed, to 1/500s. Rotate the dial at the top of the body to select the shutter speed.
Why do I think they are adequate? Since the most common lenses for this camera are 58 and 85mm, 1/30s is the minimum velocity you will able to shoot without motion-blurring the image. On the other hand, 1/500s is adequate enough for almost all circumstances, except if you want to make a wide-open bokeh at noon but, in this case, you can always carry a neutral density filter ou use your sunglasses in front of the lens.
For those circumstances in which you would want a long exposure time, there is the bulb mode. Basically, in bulb mode the shutter will remain open while the shutter release button is kept pressed. The shutter is released when the button is released, so simple as that. So, if you are going for long time exposures using a tripod, you can use this setting and a remote shutter release that can be screwed in the shutter button of the camera.
How to load film in the Zenit 122
Now that we know the basics of shooting with the Zenit 122, let’s move on and see how we load the film in it. To do this, follow these steps:
- Open the back cover by pulling the rewind dial upwards. Sometimes it may be a little difficult to do it, so you can raise the rewind crank 90° and pull it. The dial will come up and you can easily open the back cover by pulling it.
- Now, keep pulling the rewind dial so the rewind shaft is retracted inside the body. Drop the film in and press the rewind crank back to its original position. The shaft should engage the roll.
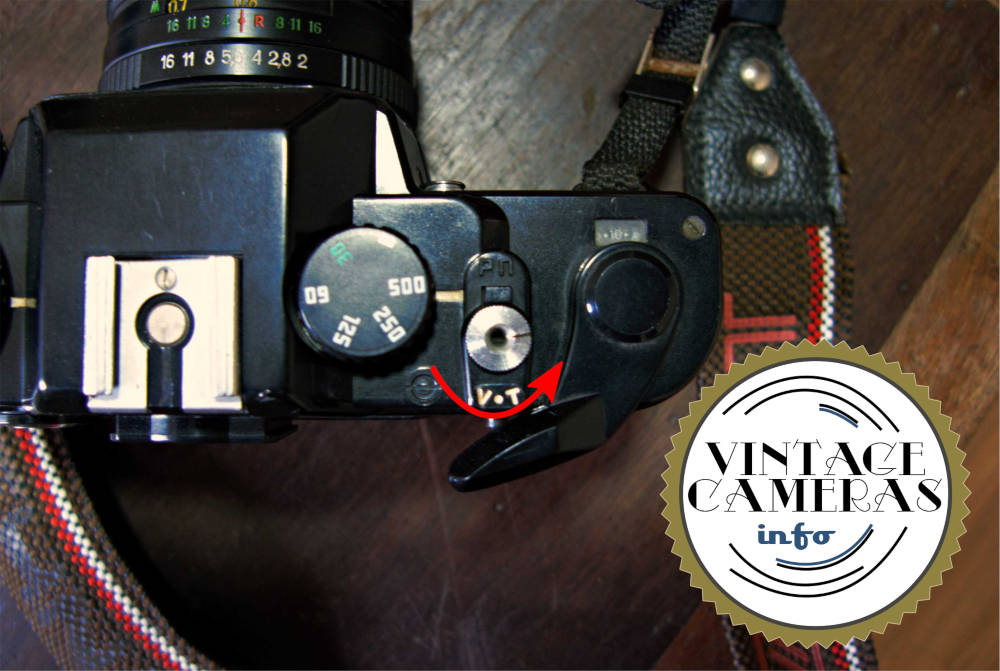
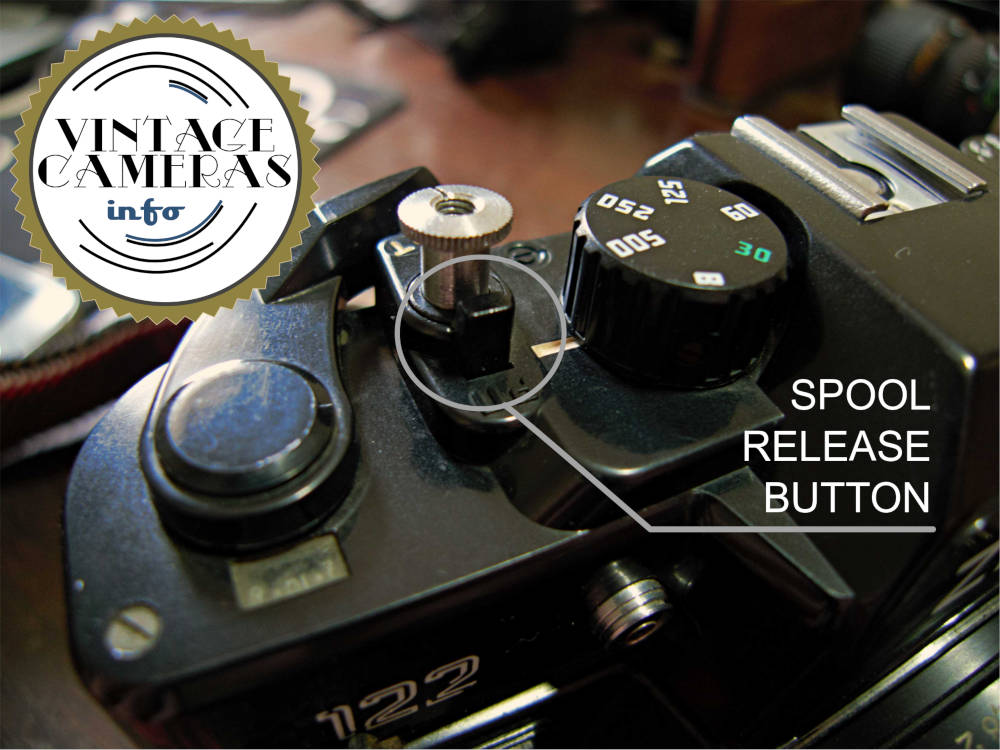
- Press the shutter release button until the end and turn it 90° counter-clockwise into the ‘T’ position as shown in the image below.
- Move the film over the rails and pass its tip inside the spool hole.
- Pull the film advance lever to stretch the film, but just a little bit to not waste too much film.
- See if the film engaged the sprockets while you were pulling the advance lever. If they didn’t, use your fingers to put them in place.
- Stretch the film a bit more with the advance lever while you close the back cover.
- Now, turn the shutter release 90° clockwise to its normal position.
- Pull the film advance lever until it reaches the end. Pull it again until it locks.
- Select the ISO corresponding to your film using the ISO dial. See how to calibrate the ISO at the and of this article.
- Done, you are good to go!
How to rewind the film in the Zenit 122
Rewind film in the Zenit 122 is a pretty easy operation. Just follow these steps:
- Press the spool release button that is located just in front of the shutter release as shown in the image above. It is a bit tough sometimes, so don’t worry and press firmly until it unlocks.
- Rotate the rewind crank clockwise until you feel the film is freed from the spool. If you are not sure, just keep cranking.
- Pull the rewind dial upward to open the back cover and remove the film.
- Done!
How to use the timer of the Zenit 122
The Zenit 122 has a timer, so you can take selfies with it! To use the timer, follow these steps:
- Place the camera in some firm place, do the composition, focusing, photometry, and make it ready to shoot.
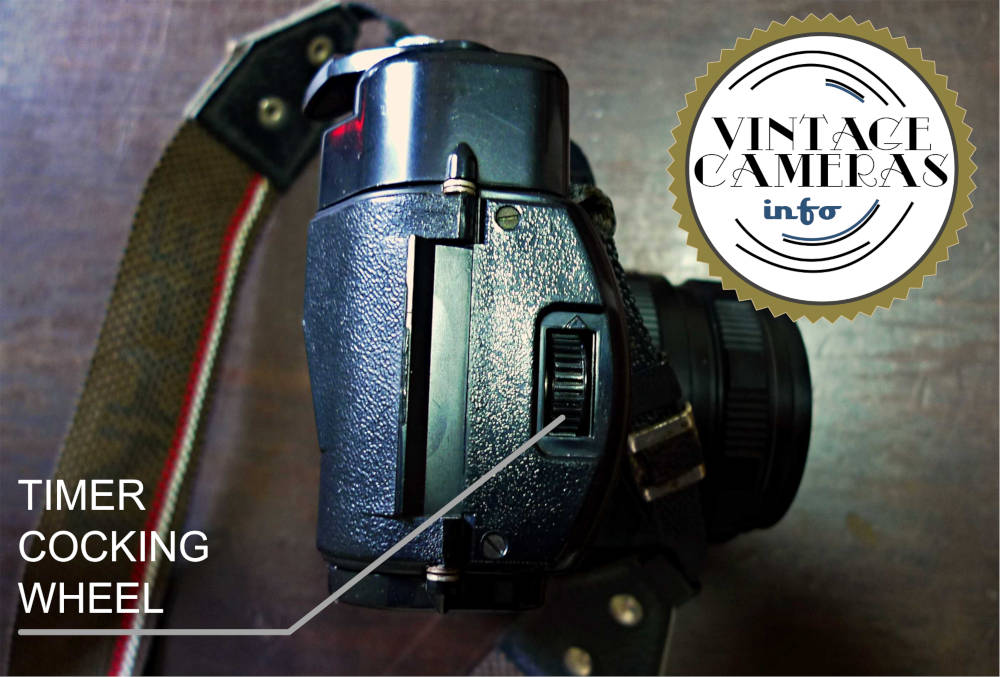
- Now you need to cock the timer using the wheel at the side of the body. Turn it upward until it locks. The indicator at the front of the camera will turn green.
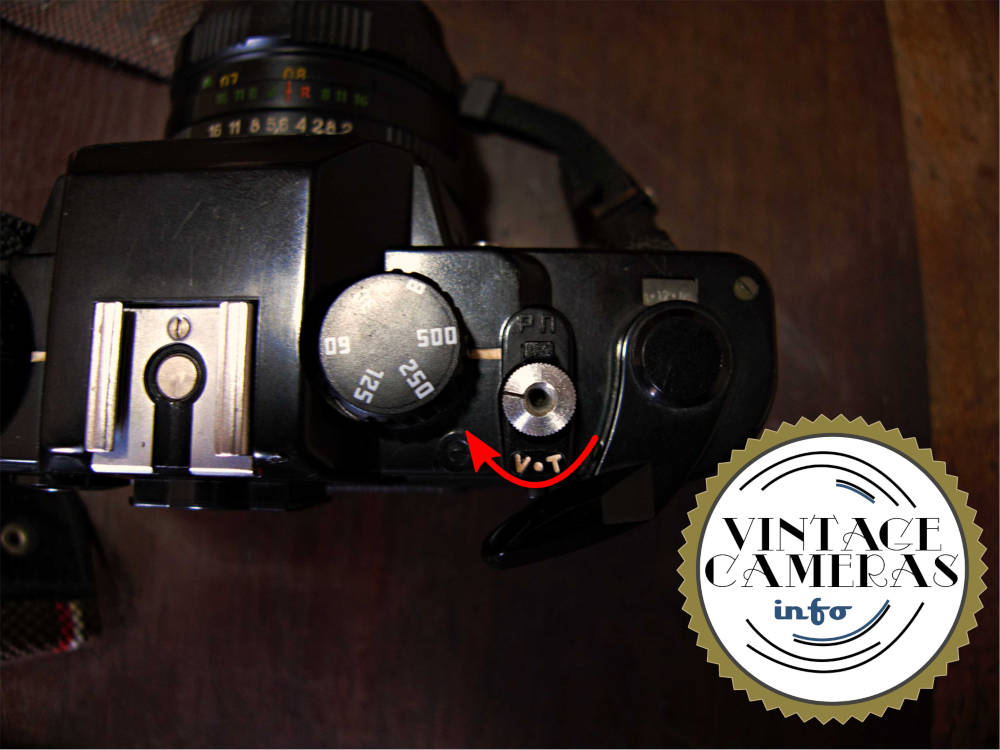
- Press the shutter release halfway and turn it 90° clockwise into the ‘V’ position as shown in the image below. Be careful at this point because if you put too much pressure it will release the shutter. Practice this before you try with the film.
- Press the timer release button just above the green indicator and run!
- The camera will shoot when the indicator turns red.
How to use the flash in the Zenit 122
To use the flash, just install it in the hot shoe at the top of the camera or use the plug at the front. The synchronous shutter speed for this camera is 1/30 and is selected through the shutter speed dial at the top of the camera body. That is way it is marked in green at the dial. Then adjust the aperture of the lens according to the flash application table.
Zenit 122 Specifications
| Type | Single Lens Reflex (SLR) |
| Film Type | 35mm (135mm) |
| Shutter Speeds | 1/30, 1/60, 1/125, 1/250, 1/500 |
| Bulb Mode | Yes |
| Lens Mount | M42 |
| Flash Hot-shoe | Yes |
| Flash Plug | Yes |
| Depth-of-field Preview | Yes |
| ISO speeds | 25, 50, 100, 200, 400 |
| Shutter timer | Yes, mechanical |
| Tripod mount | Standard 1/4″ thread |
| Batteries | 2x LR44 |
| Viewfinder type | Split-beam |
| Photometer | Three LED system inside viewfinder |
| Dimensions | 13,5 x 9,5 x 5,0 cm 5″ x 3.7″ x 2″ |
| Weight (w/o lens) | 545 grams |
Zenit 122 tips
And here are some tips I have learned using my Zenit 122 and decided to include in this instruction manual.
Calibrating the ISO
The ISO dial of the Zenit can be confusing sometimes because it is not clear if we are supposed to align the numbers or the dots with the markings. Along with that, due to the aging of optics and electronics, the calibration may not be spot on.
For these reasons, whenever I use my Zenit 122, I calibrate it using the sunny 16 rule. In a sunny day, I point the camera to a bright object, set the shutter speed according to the film’s ISO and the aperture to f/16. Then I press the shutter release to button to activate the photometer and rotate the ISO dial until the green LED goes on. Now I am ready to go!
Helios lenses
Those lenses are legendary, so it may worth buying a Zenit if even it isn’t working if the lens is in good shape. Also, buy an adapter for your digital camera. I happen to use the Helios much more with my Pentax K70 than with the Zenit bodies. The Helios is very sharp at the center of the image even when wide open and does amazing bokehs!
Attaching the lens with the right pressure
Since the Zenit 122 uses the M42 bayonet, the lens is screwed into position. However, don’t screw it too tight because it can turn into a nightmare if it gets stuck. Also, if it is not tight enough it will get loose while the focus is done, especially because the focus rings of those lenses are on the tight side.
Obrigado!
I have some questions on zenit 122, which I consider to buy.
does it have light seals of rubber, or is the light sealings built into the body?
If it has rubber light seals, is it hard to replace?
best regards // Jon
Hi Jon! I am afraid I am not able to answer this, since I don’t own this camera anymore.